
Souped Up Soup!

Yesterday I posted about my "take a peek into the produce bins and concoct some sort of soup for dinner" experience in the kitchen. I commented that tonight's soup would be similar but with sautéed celery instead of the kale. (My apologies on the typo about "now add the onions and garlic" as it was supposed to be add the onions and kale. I fixed that boo-boo.)
OK, so the planned soup just got souped up. I discovered 4 buttercup squash, from Old Market Farm, in my garage last eve. Now I did not exactly lose them, they were just momentarily forgotten. I decided to get them into the house before they froze and started rotting on me.
So I roasted the squash this AM. Revving the oven up in early AM helps to warm the chilled downstairs after a cool night.
To make this soup quickly, on an eve after working all day: get the squash steaming first, before you sauté the celery and onions. Cut a small to medium buttercup squash in half, remove seeds, and put into a pot of water that has about 1 inch of water on the bottom. When water starts to boil, reduce heat to a gentle simmer, and cook squash for about 20 minutes. It will be ready when you finish with the sauté and soup prep.
Kitchen Advice: Never boil your veggies in a pot full of water; steam in the least amount of water you can get away with and not go dry. This goes for potatoes you are cooking to mash. Less water means less nutrient loss. Pour off cooking water into a coffee mug, let cool, and drink. Get every cell enhancing mineral and nutrient any way and every way you can!
Now get going on the celery & onion saute'!
- Sauté the medium sized onion, cut into small chunks, and the celery leaves in bacon fat from local, pasture raised pigs, no nasty curing chemicals added. (Use whatever you like for gentle sautéing: pasture raised butter, coconut oil... I would avoid most vegetable oils but that is another blog post and story!) The celery will sauté quickly, add the celery after the onions are just about finished. This way you do not over cook the celery leaves.
- Add approximately 3 1/2 cups of goat's milk to the blender with 3 big cloves of the Birdsfoot garlic.
- Add the onion and celery to the blender.
- Plop in big scoops of the squash, at least use one half of the cooked squash. Be careful scooping the squash out of the shell as it is hot and a steamed squash gets mushy not rigid like an oven roasted one. (Add lots of butter and sprinkle with curry, the other half of the squash, while it is still hot so the butter melts. Mash the butter and curry into the squash. Put into a dish and take to work tomorrow!)
- Sprinkle in, oh maybe 1 tsp. of medium heat curry powder (Nature's Storehouse or the Potsdam Food Coop). I use more curry with squash or pumpkin soup because the squash flavor can handle it without being overwhelmed. Besides, the spices in curry are amazing healers!
- Blend until the consistency and smoothness you want in a cream soup is achieved.
- Pour in soup pot and gently warm.
- Ladle into soup bowls and add a pinch of unrefined sea salt, if desired.
Don't forget the beet gratings! Beets soup up the soup in several ways:
- fiber
- nutrients
- raw veggie with dinner
- contrasting color to the pretty orange soup (this artsy cooking style feeds the heart, mind, and soul!)
- beets are used as cancer therapy in Germany and Russia! Why wait to use as therapy; prevent health problems now!
Quickly grate the beet using my metal cheese grater. I sprinkled the beet gratings on top of this generously curry seasoned cream of squash/celery soup.
If the pot is big enough, or the eaters few enough, you will have left overs for lunch or later dinners this week! OR... freeze in a wide mouth, quart Ball canning jar (leave head space for expansion during the freezing process) and enjoy in a week or two!
Cheers and happy, healthy cooking!
Cream of Kale Soup... and more!

I am big on the:
Look in the produce drawers, see what seasonal produce I have on hand, and throw it all together
kind of cooking.
My peek into the produce bin came up with a bouquet of kale; gratitude goes to the Kent Family Growers. I had an onion from the Martin's and plenty of garlic from Birdsfoot Farm.
To me this looked like the makings of a good pot of soup, so...
- Saute' the medium sized onion, cut into small chunks, and the bouquet of kale, cut into thin strips, in bacon fat from local, pasture raised pigs, no nasty curing chemicals added.
- Add approximately 3 1/2 cups of goat's milk to the blender with 3 big cloves of the Birdsfoot garlic.
- Add the onion and kale to the blender.
- Sprinkle in, oh maybe 1/2 tsp. of medium heat curry powder (Nature's Storehouse or the Potsdam Food Coop).
- Blend until the consistency and smoothness you want in a cream soup is achieved.
- Pour in soup pot and gently warm.
- Ladle into soup bowls and add a pinch of unrefined sea salt if desired.
Then I discovered a beet, my beloved beets, in the refrigerator. I quickly grated the beet using my metal cheese grater. I sprinkled the beet gratings on top of this gently curry seasoned cream of kale soup.
It was divine! (And it took maybe 20-25 minutes!)
Tomorrow night will be a repeat cream soup but I will be sautéing the celery leaves from a large head of celery from the Keim Amish Family Farm. Add onion, goat's milk, garlic, curry... and, yes, the grated beets on top!
Any good stories from your kitchen about throwing together a soup after just a peak into the produce bins?
Happy cooking and eating!
Please Remove Shoes & Negative Attitudes

I painted this door sign years ago. I have glued and removed it from a couple of front doors. I was inspired to create it because of a bumper sticker: "Mean People Suck." I also related that sentiment to negative people and their energy.
This past Saturday I watched the documentary film Symphony of the Soil. I was reminded of the beautiful method of how soil rebuilds itself when we care for it in natural ways, recreating nature's gardening methods.
Another message that was clear to me: how farming with chemical fertilizers, pesticides, fungicides, and herbicides is much like fraternizing with negative people - soil / soul sucking!
These chemical means of farming literally suck the life out of the soil. Chemicals slowly and insidiously kill off the soil microbes, fungi, earth worms, and various other life forms that are essential to healthy soil and life on this planet. Chemically farmed soil becomes dry, pale, lifeless, and infertile. Food grown in this soil is nutrient deficient like the very soil it was grown in.
Negative people and negative energy (i.e. watching, listening, or reading the news) do the same to us. These things slowly and insidiously suck the life from our body, mind, and soul. Negative energy in our life is a real force that leeches the nutrients from our every body cell just as chemical farming leeches nutrients from the soil.
Chemical farming is a stress to the soil, to all biological life, and to this planet. (All are one and the same.)
Negative people and negative energy stress our physical body, our emotional/mental being, and our soul. Negative energy activates the stress response. This response eats up nutrients from our body cells. This is one reason why stressed people get sickly looking (pale like the stressed soil), age faster, and contract more acute illnesses (colds, the flu, etc.) and go on to develop more chronic lifestyle diseases than relaxed, peaceful people.

Touch each other's lives, and your own, gently! Northern Sun T-Shirt!
POSITIVE Action to take:
Surround yourself with warm, loving, positive energetic people
AND
Be a warm, loving, positive energy person!
See and inspire the good in everyone, including you!


Whole food RECIPE: Tourlou Greek Mix-Mix (made with local ingredients!)
This is positively delicious!
- 5-6 medium ripe tomatoes (Richard Paolillo's & Vanessa Bittner's Old Market Farm)
- 1 medium eggplant (Kent Family Growers)
- 2 medium red potatoes (Keim Amish Farmer)
- 1 large red pepper (Keim)
- 1 large red onion (Birdsfoot Farm)
- 4-5 good size cloves of garlic (Birdsfoot Farm)
- 2 bay leaves
- 1/2 cup olive oil (I used 1/4 cup olive oil and 1/4 cup of Kriemhild Dairy's pasture raised butter)
- dash of nutmeg and thyme, I am a heavy handed dasher! I would say a good full tsp. of thyme and slightly less than a tsp. of nutmeg
- unrefined sea salt and fresh ground black pepper to taste after cooking

The finished Tourlou, Mix-Mix, with chickpeas.
- Cut veggies into bite size chunks and mix together well (except garlic)
- Spread out in the bottom of two 8 x 13 baking pans
- add oil, butter, bay leaves, nutmeg, and thyme and mix together
- Bake at 350 F for 1 hour, set timer for every 20 minutes and mix-mix away adding water to not "fry" the veggies! This makes for a juicy creamy mix-mix!
- If veggies not tender enough after 1 hour, give them a few minutes more
- When finished cooking add the garlic via garlic pressing into the mix of veggies
- Serve and add salt / pepper to taste
- Serve with chick peas added to the mix or chunks of chicken
- A side of whole grain pita bread, warm of course, is nice
- Perhaps a 'lil Greek goat's milk feta too!
Hints:
- This dish can be eaten hot or cooled. Traditional Greek serving is when cooled allowing the flavors to meld.
- I have used zucchini, yellow squash, buttercup & butternut squash, sweet potatoes... The eggplant, tomatoes, and onion are required... after that, add veggies to your delight. The more you make, meaning the fuller the baking dishes are, use more tomatoes to add to the creamy goodness.
- Another serving suggestion: To get a raw veggie salad in with this yummy dish serve with a Fall cabbage-root veggie slaw OR sauerkraut.
Enjoy!

Cooking and Eating at Home IS the Life for ME!!
Try to sing that title to the tune of: "Farm Living is the Life for Me....!"
I confess, I do not like to eat out. The idea of eating out is fabulous: someone else doing the shopping, cooking, and washing the dishes AND I get someone to serve up the food to me!
Who can say no to that?
This writing idea came to me as I was driving my kids to school. It started off as 4 simple reasons to eat at home. And then... my mind wandered...
11 Reasons Why I Prefer to Cook and Eat at Home:
1. I truly love to cook, to stretch my kitchen artist's muscles and create fun and tasty food with what I have on hand.

Ethiopian carrots and Brussels Sprouts: First cook up a pot of red lentils (keep them firm, not mushy), then saute' up some onions, carrot coins, and Brussels sprouts in butter. Add in some mild curry powder to the veggies, mix in the cooked lentils, and toss with some cashews. Yummy, easy, seasonal dinner! Serve with a side of whole grain pita bread, warmed and slathered with butter, and a dish of local yogurt.
2. I like knowing my body cells, and my kid's body cells, are being nourished with real food. I like knowing my food is being made with high quality ingredients.
3. The vegetables and fruits I cook with... I know:
- who grew them: the Martins, the Kents, Dulli and her crew at Birdsfoot Farm, John Dewar (the local Doc gone veggie farmer)... and so many more chemical free, northern NY growers,
- where the farmer lives and grows food (no, I do not stalk my famers!) but I like to see the land, know the soil my food was grown in... that kind of picky stuff,
- how they grow the food (chemical free).

4. The animal products I use I like to know:
- see the above farmer information and
- that the meat, eggs, milk, and dairy products came from animals that are pasture raised... out there eating grass and all the plant life that they like to eat and is their natural diet.

OK, so these goats ARE wandering in the snow... but, they are free wandering, pasture raised goats when the snow melts!
5. Whole grains: when I cook at home I know the bread, pasta, noodles, pie crust, cake, cookies or any food made out of flour is 100% whole grains. Whole foods nourish our body cells for health and healing. Refined foods deplete our body cells and set our bodies up for chronic, degenerative diseases. I have yet to find a restaurant that serves 100% whole grain foods with pasta dishes, bread for sandwiches, buns for burgers and such, bread that is served at the beginning of a meal, etc.
6. The minimal amount of sugar being used in my kitchen is not refined, white, cell destroying sugar. I cook with the highest quality of cell nourishing ingredients in all my food prep and cooking.
7. I know my food is not being nuked in a microwave. Microwave cooking is best avoided in a whole health lifestyle. To learn more about microwave's impact on your food and health, click here.
8. I know my food is seasonal and local allowing my body to follow the natural rhythms of the seasons and nature. My food is living and growing in the same climate I live in and that is just good vibrational energy!
9. I use oils that contribute to my vibrant health and avoid cheap vegetable oils such as soy and canola. I use high quality olive oil for making salad dressing. Most food establishments do not invest in high quality oils.
10. I do not have to go anywhere. Home is where the heart is and my heart is happy at home!
11. I can dress up, or down, in any clothes I want. PJs at the dinner table? Sure, why not!
Reminds me of an early morning breakfast when I was 20 at McDonald's in Canton. (Yes, I had a rocky start to independent, whole food eating lifestyle. My Mom did not bring me up on McDonald's food!) A high school girl friend and I went to breakfast in our long, flannel night gowns. Made sense to us, it was breakfast and we were in our PJs. Apparently the manager was not on board with our logic! We were asked to leave and not so politely either!
Love yourself and everyone you feed with real food!
Like my blog posts? Share with like minded family, friends, co-workers, neighbors, people you pass on the streets... The healthier and happier we are, the better world we will have!

My boys baking at home. We prefer home made, whole food birthday cakes over bakery made, refined food cakes!


PS The Radiantly YOU Telesummit has been a hit! Only 2 days left to listen, BUT...To purchase, and listen to these fabulous women healer's recorded words of wisdom, over and over and forever, for only $9, click on the buy now button below!
Enjoy! You will be eternally grateful for these healing words of wisdom!

Cooking Like a Kitchen Artist
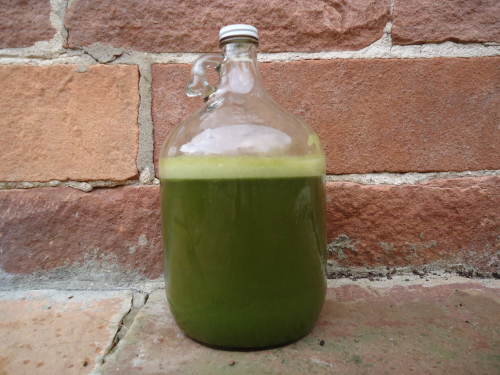
Herb Vinegar for home garden flavored salad dressings: raw, apple cider vinegar with rosemary, basil, oregano, parsley, thyme, cilantro, tarragon, mint, and nettles. I buy my vinegar from Martin's Farm Stand, add my garden herbs, and blend in the blender. Pour back into the jar, with a funnel, and enjoy all year. Put 1 quart of vinegar into the blender with the herbs and pour back into the gallon jug. Shake to mix herbs with the whole gallon.
Back a couple of blog posts, Cook Book Or Not?, I mentioned I would write about cooking like a kitchen artist. Now is the time for you to: read on, get out your local foods, and start creating with your kitchen artist's palette!

A common challenge I hear from clients and health class students is: “How do I make my cooking easy, what do I use for spices, what can I do that is different….?
First Thought: Do what is easy and familiar, make your favorite foods! The key is to turn them into whole food recipes with fresh, local, and seasonal foods.
Check out this hidden page “How to Make Any Recipe a Whole Food Recipe” to get you into the ‘whole food’ recipe make-over swing of things.
Trying to get more vegetables into your life? People get too overwhelmed by ALL the vegetables that are available in the supermarket. Common questions I hear from clients are: WHAT do I do with all of these, what goes with what, how do I cook them…..?”
Second Thought: Learn to eat in season. If the veggies you are eating are only available at certain times of the year, it makes your choices narrower at that particular time of the year. Being overwhelmed by the plethora of choices is common in today’s culture of being able to eat broccoli, strawberries, asparagus, and every other fruit or vegetable 12 months out of the year. Create meals using vegetables that are available locally and in season. This makes the choosing easier, because there is not so much variety available all the time. It also allows you the opportunity to have a diet that is varied over the course of the calendar year.
Helpful hints around seasonal eating:
- I believe seasonal eating would help to cut down on food sensitivities as well. When your body is not being subjected to the same food, all the time, you are much less likely to develop food sensitivities and intolerances. Local, seasonal eating was nature's way of varying our diets.
- When you eat locally grown food you help cut down on the transporting of food all over the globe. This can have huge impacts on the environment when we are using less fossil fuels moving food around the earth.
Examples of seasonal foods for Northern NY State:
Spring: spinach, asparagus, green onion, early lettuce, rhubarb, wild leeks, spring sorrel, peas
Summer: leafy salad greens, summer squashes, seasonal berries from strawberries to late summer raspberries & blackberries, tomatoes, peas, strawberries, blueberries, raspberries, gooseberries, currants, juneberries, cherries, garlic, carrots, new potatoes, fresh herbs, corn, onions, melons…
Fall: root veggies, winter storage squash, cabbage, apples, pears, peaches, fall raspberries
Winter: stored root veggies, kale & collards still in the garden, canned tomatoes and veggies, frozen veggies and berries
Many websites offer their version of a “what produce is in season” charts for the geographical region you live in. www.gardenshare.org
http://www.simplesteps.org/eat-local
When you eat seasonally, what you eat changes with each seasons. Your meal planning and preparing takes on a rhythm of simplicity. I cannot stress this enough: keep it simple. Do not over think things. Wing it in the kitchen. If the meal was a winning combination, do it again. If the meal is not the taste you were looking for, eat it with gratitude for the farmers who grew the food, the earth/water/sun, etc. that provided the growing environment, and the work you did in the kitchen. Make a mental note (or keep a cooking journal, if that is easier for you) and do not repeat that particular cooking concoction.
If you think about vegetable dishes, they are the same things just cooked a different way. One fall or winter night you might roast potatoes, carrots, onion, and parsnips and another night you might throw those same types of veggies into a beef or chicken stew. On another night you might stir fry them and add meat, fish, scrambled eggs, or beans. Another night you might gently steam them, mash them up with grass fed butter and unrefined sea salt, and serve with a side dish of chicken, beans, or fish. This is what I mean about simplicity and not over thinking.
To these above meals add a grated root veggie salad using different root veggies: rutabaga, celeriac and beets with some finely chopped cabbage. Toss with an herbed, homemade oil and vinegar dressing and voila, dinner!

Summer cooking will be more tomatoes, eggplants, peppers, yellow squash and zucchini, and other summer veggies enjoyed with green, leafy salads and raw carrots, baby beets, and cucumbers.
Let go of the idea that you have to work from a recipe and cook up this fabulous gourmet meal every night. 100 years ago, people ate what they had on hand, in season, with no regards for cook books and recipes.
In my herb garden I grow: mint, basil, cilantro, parsley, oregano, thyme, rosemary, tarragon, sage, marjoram, certain edible flowers, etc. It is so easy to step outside, cut a bunch of herb sprigs and brighten up a raw salad or add to cooked vegetable just before you serve them. I do not recommend cooking the fresh herbs as you will save the fresh flavors for your eating enjoyment.
I keep standard herbs and herb blends handy to spice things during the non-garden, no fresh herb months:
Italian spices: rosemary, thyme, oregano, parsley, basil, marjoram
Curries: mild, medium, or hot to your liking
Chili type spices: Chili powder, cumin, turmeric, and coriander
Pulled pork blend: (I also put this on chicken, in chili, and in stir fries if I am looking for this particular taste): ground pepper, cumin, garlic powder, onion powder, paprika, chili pepper, thyme, all spice, turmeric Use 1 Tbsp. of each spice except 1 ½ tsp. thyme, allspice and turmeric
Chinese 5 spice for Asian stir fries
Cooking and eating is wonderful, tasty fun! Relax and enjoy the process for good health in mind, body, and soul!
PS
I was making chocolate chip cookies this AM, for my boy's school lunches, and I reminded myself of a wonderful Whole Food Recipe Conversion tip:
- Never use 100% oat flour to make cookies. Why you may ask? Not because the flavor isn't yummy... it is because the cookies are very crumbly. Frankly, they can fall apart if handled roughly. Now eating cookie chunks and crumbs is an ok thing but a whole cookie that does not fall apart has a certain appeal!
OK, recipe... I know I will get emails asking where is the recipe? See below.

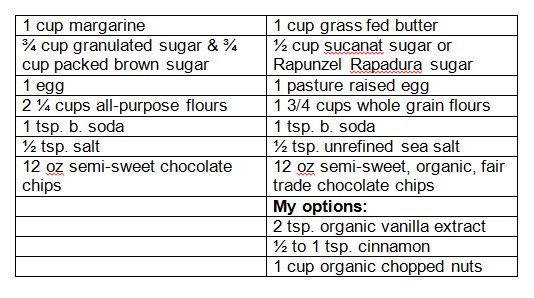
The cookie recipe began in this Betty Crocker cookbook!
The below recipe is the chocolate chips cookies, the left side is the original recipe and the right side is the converted to whole foods recipe.
- Heat oven to 375 F.
- Mix butter, sugar, and egg. Add vanilla here if using and I encourage vanilla!
- Stir in flour, b. soda, and salt. Add cinnamon here, if desired.
- Add in chocolate chips and nuts (if using nuts).
- Dough will be stiff. Allow it to sit for 5-10 minutes as the whole grain flours continue to absorb the liquids. If dough is not stiff enough for cookie dough consistency, add 1 tbsp. of flour at a time to get it to the necessary stiffness of cookies.
- Bake one cookie for 8-10 minutes as a tester.
- If all looks good with that one cookie, bake those cookies up & enjoy!

The finished, yummy, oat flour chocolate chip cookies! They do not last long!
Comments, thoughts? Write me a note in the comments below. Happy day to you!
Whole Food Pumpkin Pie!
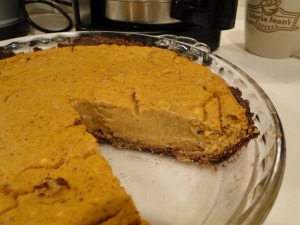
I had a request for how I would make a lower sugar, lower carb pumpkin pie for the fall holiday table... maybe for Thanksgiving, Fall Equinox, a Harvest Fest... you decide when and whip up a tasty, whole food pie treat.
Here is how I make my yummy Autumn pumpkin pies. Enjoy!

Lower sugar, low carb Pumpkin Pie
Ingredients Praline Crust:
- 1/4 cup melted butter*
- 1 1/4 cup finely chopped pecans (almonds or coconut are other fun variations)
- 2-4 tbsp. sucanat sugar (Potsdam Coop & Nature's Storehouse)
- 1/8 teaspoon unrefined sea salt
- 1/8 to 1/4 teaspoon ground cinnamon

Sugar Pie Pumpkins
Pie Filling: You can also use a butternut or buttercup squash.
- 1 (15-ounce) can no sugar added pumpkin filling, organic of course. To cook your own pie pumpkin, see below.
- 1/3 to ½ cup sucanat sugar
- 1 tablespoon pumpkin pie spice
- 1 Tbsp. vanilla extract
- 1 1/4 cups heavy cream* (If you buy a pint of heavy cream, use 1 cup here and 1 cup for whipped topping, just add 1/4 full fat milk* to make up the difference.)
- 4 eggs*

Long Pie Pumpkins
Directions: Preheat oven to 350 degrees F.
Make the crust:
- Mix all crust ingredients together in a small bowl.
- While mixture is still warm from the butter, press it evenly into the bottom of a deep-dish pie pan.
- Bake for about 5 minutes, or until browned.
- Remove pie crust from oven.
Make the filling: Turn oven to 425 F
- Place all filling ingredients in a medium bowl and mix well with a wire whisk.
- Pour filling into your pre-baked pie crust.
- Bake for 15 minutes and then reduce the oven temperature to 350 degrees F.
- Continue to bake for an additional 50 to 55 minutes.
- To test to see if cooked enough, stick a sharp knife in the center; if it comes out clean, the pie is done.
- Cool and then chill before serving.
- To serve, top each slice with a dollop of low carb whipped cream.
Lower Carb Fresh Whipped Cream:
- 1 cup heavy cream*
- 2 tbsp. to ¼ cup sucanat sugar
- 1-3 tsp. vanilla extract, I tend to go for the more is better, you do not miss the sugar when you add vanilla, maybe a dash of cinnamon too!
Cooking your own pie pumpkin: I take the whole little pie pumpkin and put it in a pot with about 1 inch of water in the pot. Cover, bring to a boil, and reduce heat to a very gentle simmer. Check in 30 minutes, if a sharp knife slides into the flesh easily, it is done. I carefully remove it from the pot and put it in a bowl or plate with upturned edges. Cut into pieces and puree the whole pumpkin: seeds, skin, and all. A blender works best. Use what you need for the pie and make curry pumpkin soup with the rest!
Curry Pumpkin Soup: This is as easy as putting the rest of your pie pumpkin in the blender with milk* (add enough milk to blend the pumpkin into a puree and then add what you need to get the thickness you are looking for in a creamy soup) and adding your favorite blended curry spice to your taste. Blend, heat, enjoy!
*I suggest using butter, eggs, and whipping cream be from animals raised naturally: grass fed cows and chickens foraging for their own natural foods.