
Developing Our Personal Power
I took the words in the below two paragraphs, with permission, from Elissa Hayman's November blog post. Elissa is a spiritual healer from New Mexico. I was introduced to Elissa and her work by a fine, local lady and friend.
I was stopped in my tracks by the most fiery blaze of coppery gold color I ever saw, radiating off a long line of cottonwoods on the riverbank.
Someone else had stopped to admire them and we got to talking. He turned out to be an herbalist who lived in the nearby mountains. His renowned company, Dragon River Herbals, was on the scene in Santa Fe; they supplied doctors and health facilities with their high-quality, wild-crafted, organic products.
Through this herbalist, I learned something interesting about wild-crafted herbs: their medicine is so much more potent because in Nature, they go through a lot of stress. The plants' response to the natural stressors in their environment makes them produce more potent medicinal properties. The "fat cat" herbal plants grown in cultivation don't need to develop the inner strength necessary to BE strong medicine.
That's something to remember in November 2014, when it will behoove us to see challenges like a plant in the wild, as something that develops our powers.
I love these words. It is the wise woman teaching I do around the foods we eat, the herbal plant foods we use for medicine, and the way we cultivate personal power in our mind, body, and soul.
Organic foods have this magic about them as well! When food is grown organically, the food itself has to fend off foreign invaders. In this dance for survival, the organically grown food develops higher amounts of nutrients and develops nutrients that do not exist in conventionally grown agriculture's foods (because conventionally grown foods do not survive these natural stressors).
We are approaching the American holiday of Thanksgiving; a time to be grateful for all that we have and have experienced in life.
Life experiences are the building blocks of who you are as a being; your wild crafting as a human. Take a moment to express gratitude, every day, for your life and all the wild crafting that has made you grow stronger. Life experiences are powerful medicine!
Feed your body, mind, and soul well!

Gratitude for making it safely into the Supai Village in the Havasupai Home, the Indians of the Blue Waters. Gratitude for surviving the long and very, hot trail down into the canyon. Getting out was easy; we started at 4:30 AM and beat the sun out of the canyon!
Happy Thanksgiving with Love!
Herbal Recipe to Clean the Liver from Holiday Eating and Imbibing!
Simple Liver Nourishment Cleanse
Liver Nourishment: This is a very simple way to nourish the liver as it goes about its non-stop job of filtering your blood. Your liver is not “dirty.” Spending a few days focusing on nourishing this important organ is a good way to prevent disease and heal your body. Love your liver with good food, liver specific herbs, and relaxation. Oh yeah, did I mention fun and laughter? Anger is a toxin to the liver; let go of anger and revel in fun, love, and laughter.
Raw food fast for 3 days: lots of local and seasonal berries / fruit in AM with nuts and seeds and then vegetable salads and raw nuts and seeds at noon & PM meals.
***If pre-diabetic, diabetic, or you have any metabolic syndrome issues (where you need to not have high levels of blood sugar surging through your system) keep your intake of fruit conservative and eat more vegetables.
Raw root veggie and cabbage slaws are great in fall and winter for the raw, seasonal veggies.
AM liver flush before any food: juice of 1 whole lemon, 1-2 tsp olive oil, pinch of unrefined sea salt. You can use this simple liver flush in the PM and/or the AM.
I have clients who do it in the AM because they drink their Essiac detox tea at night.
Detox infusion: purchase an ounce of each of these herbs: cut burdock root, cut dandelion root, nettle leaf, dandelion leaf, and red clover blossom.
Each night heat 1 quart of water, stainless steel pot please. When water is simmering turn to very low heat and simmer 1 tsp. each of the burdock and dandelion roots for 10 minutes. This is a very gentle simmer with the cover on the pot.
After the ten minutes, shut off the heat and have 1 tsp. each of the dandelion, nettle, and red clover. Add to pot, stir to get wet and cover pot. Let it sit over night to steep, pot covered. Strain into quart canning jar in AM and drink 3-4 cups over the course of the day.
Relaxing habits when doing a liver nourishing cleanse: Plenty of fluids; lots of good, restful sleep, eating in a calm environment (without screens) and chewing very slowly and thoroughly, yoga, massage, relaxing by the fire or under a favorite tree (seasonally dependent behaviors!) while reading a good book…the point is to nurture the whole you and make your liver feel at peace and loved.
When to nourish the liver: Ideally 4 times a year at the spring and fall equinoxes and the summer and winter solstices. I recommend waiting past the Winter Solstice, after the December holidays, for obvious reasons!
Milk thistle is a good herb to take for liver nourishing and rebuilding. It can be added to the above dandelion, etc. herb tea. Milk thistle is a seed and needs to be added and simmer with roots and/or barks.
http://www.paulayoumellrn.com/making-herbal-infusions-teas/
Capsules, tinctures, teas of milk thistle are good options as a single herb or as a combination herbal formula with turmeric and perhaps ginger…
Taking milk thistle for a couple of weeks after a three day nourishing cleanse can help to nourish and rebuild the liver. You can make milk thistle into a tea with nettles. Again, simmer the milk thistle seeds, very gently for 10 minutes before adding the nettle leaves. Shut off the heat before you add nettle leaves and allow the herbs to infuse, covered, for at least 4 hours.
If you would prefer to do a more intense liver nourishing (that is pre-packaged for you, creating ease), go to this website: www.herbdoc.com and search under the 5 day detox programs for the liver cleanse. It is a very complete liver cleanse kit with a well written book explaining liver cleansing and its benefits to your health and longevity. Think of it as nourishing your liver, fortifying it with the nutrients it needs to do its blood filtering job well.
Dr. Schulze’s products are top of the line and use high quality herbs. They tend to be a bit more expensive but quality is quality.
You can do a more intense, longer, liver / organ cleanse by putting the materials together yourself and following the cleanse for more than 3 days
- Whole foods, raw
- Herbal teas
- Fresh made juices
- Lots of pure water (no chlorine and flouride from municipal water supply; both are toxins to body cells and your liver.)
- AM flush
If you have diabetic tendencies do not do a "juice or herbal tea" only liver cleanse. Eat food and keep your protein level up.
Need help? Give me a shout.
Signs of Fall in the Kitchen

Some signs of fall, in my kitchen, are:
- Squash, squash soup!
- Root veggies of all shapes, colors, and flavors... yummy beets!
- Brussels Sprouts (Create a soup with b. sprouts using the Kale soup recipe, roast the b. sprouts before pureeing into soup.)
- Cabbage!

- Sauerkraut... the crock has come out of its summer hiding spot:

To make the first batch of fall sauerkraut, cabbage from the Martin's Farm Stand.
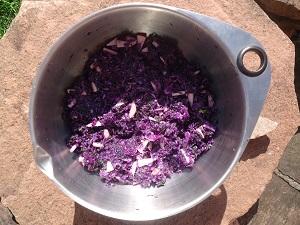
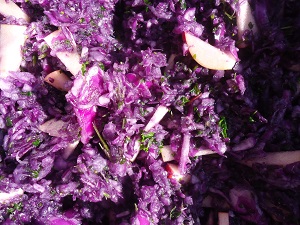
The close up, below, displays the green bits of parsley from my front yard herb garden, the green bits of stinging nettles harvested from my yard (I am assuming the sting will leave during the fermentation process much like it leaves during the cooking process), and the chunks of local apples from the Martin's.
I make sauerkraut because:
- Sauerkraut is good for gut microbes,
- I can use local cabbage and preserve it for weeks,
- It is quick and easy to make a batch that will be about 3-4 quarts (takes me about 30 to 40 minutes including clean up),
- and, after sitting for 10 to 14 days I have 3-4 quarts of food that will enhance meals and fall root veggie salads for 2-3 weeks.
- I have just enough time to ferment another crock with different goodies added to the cabbage: beets, carrots, celeriac, grated (raw) squash, parsnips, turnips, rutabaga.... before the current batch is gobbled up!
For a kraut recipe, click here. No crock to ferment in? No worries, use wide mouth ball canning jars.
Enjoy!
PS I confess, I no longer use the hand grater (see my grating picture in my kraut recipe blog post that I linked above) to grate my veggies. I use my food processor. It cuts the prep time in less than 1/2!
Souped Up Soup!

Yesterday I posted about my "take a peek into the produce bins and concoct some sort of soup for dinner" experience in the kitchen. I commented that tonight's soup would be similar but with sautéed celery instead of the kale. (My apologies on the typo about "now add the onions and garlic" as it was supposed to be add the onions and kale. I fixed that boo-boo.)
OK, so the planned soup just got souped up. I discovered 4 buttercup squash, from Old Market Farm, in my garage last eve. Now I did not exactly lose them, they were just momentarily forgotten. I decided to get them into the house before they froze and started rotting on me.
So I roasted the squash this AM. Revving the oven up in early AM helps to warm the chilled downstairs after a cool night.
To make this soup quickly, on an eve after working all day: get the squash steaming first, before you sauté the celery and onions. Cut a small to medium buttercup squash in half, remove seeds, and put into a pot of water that has about 1 inch of water on the bottom. When water starts to boil, reduce heat to a gentle simmer, and cook squash for about 20 minutes. It will be ready when you finish with the sauté and soup prep.
Kitchen Advice: Never boil your veggies in a pot full of water; steam in the least amount of water you can get away with and not go dry. This goes for potatoes you are cooking to mash. Less water means less nutrient loss. Pour off cooking water into a coffee mug, let cool, and drink. Get every cell enhancing mineral and nutrient any way and every way you can!
Now get going on the celery & onion saute'!
- Sauté the medium sized onion, cut into small chunks, and the celery leaves in bacon fat from local, pasture raised pigs, no nasty curing chemicals added. (Use whatever you like for gentle sautéing: pasture raised butter, coconut oil... I would avoid most vegetable oils but that is another blog post and story!) The celery will sauté quickly, add the celery after the onions are just about finished. This way you do not over cook the celery leaves.
- Add approximately 3 1/2 cups of goat's milk to the blender with 3 big cloves of the Birdsfoot garlic.
- Add the onion and celery to the blender.
- Plop in big scoops of the squash, at least use one half of the cooked squash. Be careful scooping the squash out of the shell as it is hot and a steamed squash gets mushy not rigid like an oven roasted one. (Add lots of butter and sprinkle with curry, the other half of the squash, while it is still hot so the butter melts. Mash the butter and curry into the squash. Put into a dish and take to work tomorrow!)
- Sprinkle in, oh maybe 1 tsp. of medium heat curry powder (Nature's Storehouse or the Potsdam Food Coop). I use more curry with squash or pumpkin soup because the squash flavor can handle it without being overwhelmed. Besides, the spices in curry are amazing healers!
- Blend until the consistency and smoothness you want in a cream soup is achieved.
- Pour in soup pot and gently warm.
- Ladle into soup bowls and add a pinch of unrefined sea salt, if desired.
Don't forget the beet gratings! Beets soup up the soup in several ways:
- fiber
- nutrients
- raw veggie with dinner
- contrasting color to the pretty orange soup (this artsy cooking style feeds the heart, mind, and soul!)
- beets are used as cancer therapy in Germany and Russia! Why wait to use as therapy; prevent health problems now!
Quickly grate the beet using my metal cheese grater. I sprinkled the beet gratings on top of this generously curry seasoned cream of squash/celery soup.
If the pot is big enough, or the eaters few enough, you will have left overs for lunch or later dinners this week! OR... freeze in a wide mouth, quart Ball canning jar (leave head space for expansion during the freezing process) and enjoy in a week or two!
Cheers and happy, healthy cooking!
Cream of Kale Soup... and more!

I am big on the:
Look in the produce drawers, see what seasonal produce I have on hand, and throw it all together
kind of cooking.
My peek into the produce bin came up with a bouquet of kale; gratitude goes to the Kent Family Growers. I had an onion from the Martin's and plenty of garlic from Birdsfoot Farm.
To me this looked like the makings of a good pot of soup, so...
- Saute' the medium sized onion, cut into small chunks, and the bouquet of kale, cut into thin strips, in bacon fat from local, pasture raised pigs, no nasty curing chemicals added.
- Add approximately 3 1/2 cups of goat's milk to the blender with 3 big cloves of the Birdsfoot garlic.
- Add the onion and kale to the blender.
- Sprinkle in, oh maybe 1/2 tsp. of medium heat curry powder (Nature's Storehouse or the Potsdam Food Coop).
- Blend until the consistency and smoothness you want in a cream soup is achieved.
- Pour in soup pot and gently warm.
- Ladle into soup bowls and add a pinch of unrefined sea salt if desired.
Then I discovered a beet, my beloved beets, in the refrigerator. I quickly grated the beet using my metal cheese grater. I sprinkled the beet gratings on top of this gently curry seasoned cream of kale soup.
It was divine! (And it took maybe 20-25 minutes!)
Tomorrow night will be a repeat cream soup but I will be sautéing the celery leaves from a large head of celery from the Keim Amish Family Farm. Add onion, goat's milk, garlic, curry... and, yes, the grated beets on top!
Any good stories from your kitchen about throwing together a soup after just a peak into the produce bins?
Happy cooking and eating!
Ice Cream's Purpose
To Every Thing (turn, turn) there is a season (turn, turn)...
To everything there is a purpose!

So you are asking me, what real purpose could ice cream possibly have? Ready for a story? Sit down, let me tell you a story. Stories are the fibers that weave us together as community!

The recent Indian Summer has been a joy. I love warm fall days with bright blue skies. 75 degrees is about as perfect as it gets. This is still good swimming weather!
The sudden Autumn heat made me think some ice cream would be a good idea. Now I confess, I am not a big ice cream eater, maybe once or twice a summer. Ice cream was just appealing to me. My sister was visiting during this fine summery fall weather. After a hike in Stone Valley, I threw out a "Hey, let's get some ice cream" to her and my kids.
Mistake #1, I opened my big mouth before I thought about it and they (my 2 boys and my sister) were not going to let me off the hook on this one.
So, off to the Potsdam Food Coop a shopping we will go! (I had my way and organic, quality ice cream was on the shopping list!)

I suggested we try a pint of The Three Twin's Dad's Cardamom flavor ice cream. Somehow we left with that, the Sea Salt Caramel, AND the 3 pint container of the Alden's Organic Vanilla ice cream. My sister wanted to get the Three Twins Milk Coffee ice cream as well.
Someone had to be the voice of reason... 5 pints of ice cream for 4 people? Seriously? They listened, we skipped the coffee ice cream!

So, are you wondering about the whole "ice cream's purpose" thing here? Let me just say this:
Ice cream in your freezer is like the canary in the coal mine. It is the perfect way to gauge the correct temperature setting of your freezer. Ice cream too hard to eat? The freezer needs to be turned down, meaning the temperature inside the freezer needs to be raised a bit. Ice cream too mushy and runny? Time to set the temperature in your freezer a tad bit lower.
I recommend any freezer temperature changes be carried out in tiny, little increments and tested frequently. It is totally acceptable to leave a spoon right on top of the freezer, you know, just in case an emergency check is required.
Caution: Do not ever hide the spoon inside the freezer. Way too cold in the mouth!
Action to take: Head on over to the Potsdam Coop or your local natural food store that carries quality, organic ice cream and get some now... before the Indian Summer escapes us!
PS By the way, I do recommend the Milk Coffee ice cream. It is divine! The cardamom was exquisite! Vanilla is simply scrumptious and the Sea Salted Caramel is a must try. You decide!
Tell me your ice cream story!
PPS Remember to join the Local Living Venture and I as we rock your world (no, not with ice cream) with vibrant health and healing messages! Whole Health & Healing Academy continues this Thursday evening with Natural Foods Know How. See you there!
Whole Food Pumpkin Pie!
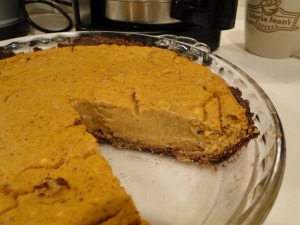
I had a request for how I would make a lower sugar, lower carb pumpkin pie for the fall holiday table... maybe for Thanksgiving, Fall Equinox, a Harvest Fest... you decide when and whip up a tasty, whole food pie treat.
Here is how I make my yummy Autumn pumpkin pies. Enjoy!

Lower sugar, low carb Pumpkin Pie
Ingredients Praline Crust:
- 1/4 cup melted butter*
- 1 1/4 cup finely chopped pecans (almonds or coconut are other fun variations)
- 2-4 tbsp. sucanat sugar (Potsdam Coop & Nature's Storehouse)
- 1/8 teaspoon unrefined sea salt
- 1/8 to 1/4 teaspoon ground cinnamon

Sugar Pie Pumpkins
Pie Filling: You can also use a butternut or buttercup squash.
- 1 (15-ounce) can no sugar added pumpkin filling, organic of course. To cook your own pie pumpkin, see below.
- 1/3 to ½ cup sucanat sugar
- 1 tablespoon pumpkin pie spice
- 1 Tbsp. vanilla extract
- 1 1/4 cups heavy cream* (If you buy a pint of heavy cream, use 1 cup here and 1 cup for whipped topping, just add 1/4 full fat milk* to make up the difference.)
- 4 eggs*

Long Pie Pumpkins
Directions: Preheat oven to 350 degrees F.
Make the crust:
- Mix all crust ingredients together in a small bowl.
- While mixture is still warm from the butter, press it evenly into the bottom of a deep-dish pie pan.
- Bake for about 5 minutes, or until browned.
- Remove pie crust from oven.
Make the filling: Turn oven to 425 F
- Place all filling ingredients in a medium bowl and mix well with a wire whisk.
- Pour filling into your pre-baked pie crust.
- Bake for 15 minutes and then reduce the oven temperature to 350 degrees F.
- Continue to bake for an additional 50 to 55 minutes.
- To test to see if cooked enough, stick a sharp knife in the center; if it comes out clean, the pie is done.
- Cool and then chill before serving.
- To serve, top each slice with a dollop of low carb whipped cream.
Lower Carb Fresh Whipped Cream:
- 1 cup heavy cream*
- 2 tbsp. to ¼ cup sucanat sugar
- 1-3 tsp. vanilla extract, I tend to go for the more is better, you do not miss the sugar when you add vanilla, maybe a dash of cinnamon too!
Cooking your own pie pumpkin: I take the whole little pie pumpkin and put it in a pot with about 1 inch of water in the pot. Cover, bring to a boil, and reduce heat to a very gentle simmer. Check in 30 minutes, if a sharp knife slides into the flesh easily, it is done. I carefully remove it from the pot and put it in a bowl or plate with upturned edges. Cut into pieces and puree the whole pumpkin: seeds, skin, and all. A blender works best. Use what you need for the pie and make curry pumpkin soup with the rest!
Curry Pumpkin Soup: This is as easy as putting the rest of your pie pumpkin in the blender with milk* (add enough milk to blend the pumpkin into a puree and then add what you need to get the thickness you are looking for in a creamy soup) and adding your favorite blended curry spice to your taste. Blend, heat, enjoy!
*I suggest using butter, eggs, and whipping cream be from animals raised naturally: grass fed cows and chickens foraging for their own natural foods.