
Spring Fling with Nettles

Stinging nettles poking out of the ground, 4/16/15.
I grow nettles in the "flower" bed up against my home. I have been asked on many occasions: "What person in their right mind would plant nettles in any flower bed and the bed right up against the house?" The answer is obvious to me; I am not in my right mind and who wouldn't plant nettles so close to the house? They are oh so close when I need them for soups. stews, stir fries, pesto, tinctures, medicinal infusions, etc.
Now here is the double edged sword with this situation: they are close at hand but these 'lil buggers like to run and take over the world just like mints. They create this under soil runner that, well, just runs, and runs, and runs spiraling out of control. I spend the spring pulling the renegade nettles out of the rest of the flower bed in front of my home. When I planted them, 5 years ago, I politely asked them to stay in their space on the side of the house. I even dug down into the soil and planted sandstone pieces to deter them from running. They out smarted me.
As aggravating as this can be, I do have a steady supply of spring nettles that I do not feel guilty about pulling. I snip the leaves to eat and plant the runners along the yard's edge hoping for yet more nettles to eat and make medicine with.

My bowl of nettle tops and leaves.

A close up of 2 nettle tops ready for dinner.

Nettles in the pan, a gentle saute' in butter is all that is needed.

The stems that I gently cooked first; why waste the nutrients?

Cooked nettles waiting for me to consciously devour them.

The finished salad with nettles scattered across the top.
I have made mention of my Spring difficulties around food. All winter I graciously and gratefully eat local cabbage, root veggies, and squash. I save my frozen local summer veggies to tide me over when I can no longer stand the thought of a root veggie and cabbage slaw. Yes, it does happen. (My winter leftovers are waiting to be made into sauerkraut when I can dig enough wild leeks to enhance this kraut batch.)
I yearn for local food: asparagus, greens, fiddle heads, peas, strawberries...
To survive until the local food is bountiful once again, I buy food from California. There, I confessed. The above salad is Romaine lettuce, celery, carrots, and juicy red peppers from California. I also buy non-local fruits: mango, banana, kiwi, citrus, and canned organic pineapple. I am desperate for neatly gift packaged sunshine to tide me over to the local food scene. A ripe mango has a serious amount of sun waiting to burst out of its skin. I bow my head in gratitude to the people, the trees, and the soil that brings me these gems to keep me happy.
I plopped the above salad down in front of my kids, minus the nettles of course. They would have flipped had I expected them to eat Nettles! (They did each have a small spoonful that they chucked into their mouths and barely chewed before swallowing. Someday they will appreciate the things I have exposed them to...) Here was my salad response:
"Finally, a real salad. No more nasty cabbage - root veggie slaw! Yay!"
Poor kids, they suffer so.
"Wow, Mom broke down and bought something that didn't grow within 20 miles of our home."
When do they learn to not harass the person keeping them in food?
Tip for the day: Get outside. Snip some nettles. Hey, dig some wild leeks and saute' them together, ever so gently. Enjoy the taste sensation, the local wild food, and the spring nourishment for your body. Oh yeah, don't bother sharing with the kids!
To create your own female energy spring fling:
Join the Female ♀ Moon Cycle Wisdom Training
Tuition, this year, stays at $72 Bucks in honor of My Mom,
an awesome female, & her Birthday (April 17th)!

Serve Up More Veggies to Your "Valentine" Kids
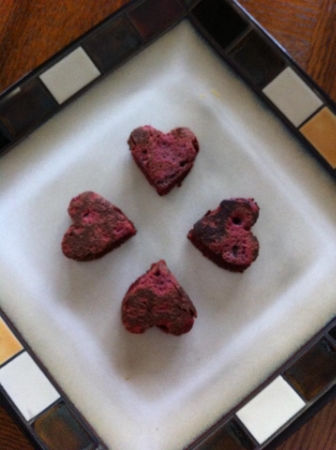
Beet Infused LOVE Pancakes!
Photo Courtesy Of Christina Smith, Parishville.
I am asked this question quite often:
"How do I get my kids to eat more vegetables and less junk?" (This topic pertains to anyone in need of more veggies, not just kids!)
The easy answer is this: "Serve them vegetables and do not bring junk into the home. They can only eat what is available to eat."
So I know you Moms are chuckling and maybe thinking... easy for you to say Paula, you don't live with my kids.
My kids ate every fruit or vegetable I gave them (Well, maybe not broccoli, but remember that cruciferous veggie taste is a strong one!) until a certain age. It was like veggie eating (not so much the fruits) almost stopped on a dime. It left me wondering what had happened to my happy to eat veggie kids. The funny phenomenon is this: when my oldest boy decided veggies did not tantalize his palate anymore, it was a license for my younger son to bag eating veggies too. "No way Mom, Jake doesn't touch them and I am not either."
What IS a Mom to do?
I say: Sneak feed your kids more nasty (their word) vegetables!

Photo Courtesy Of Christina & Brycen Smith, Parishville.
- Puree cooked beets in the blender with the milk, eggs, and butter for the pancake batter. Pour into mixing bowl and finish making your pancake batter.
- Use cooked squash, sweet potatoes, carrots, etc. in the same manner. I do confess... broccoli in pancakes is not a winning combination with kids! Remember to add spices to these beautifully colored pancakes: cinnamon, cardamom, nutmeg, ginger, star anise... perhaps a dash or two of vanilla!
- I used to add spinach to pancakes and called them "Shrek" pancakes. They loved it and gobbled them up. At the time, they loved the Shrek movies. When they finally figured out my scam... I was not popular in the kitchen for a bit of time. It did work for a couple of years so I was grateful for the added veggies.
- Chocolate milk for my kids was this: raw goat's milk, cocoa powder, 1/2 ripe banana, vanilla extract, and cooked squash. Use enough squash to add sweetness but not so much that the end product is thick like a milk shake... unless, of course, you want to pass it off as a milk shake. For years my kids had no clue a milk shake actually contained ice cream!
- Add cooked beet to a berry smoothie, not so much that it overwhelms the berry taste. Beets are very earthy in taste.
- For more information on beet's blessing to your kid's and your body's health, click here and scroll down to read beet information: http://www.paulayoumellrn.com/blog/2013/01/26/the-beet-goes-on
- Puree a bit of cooked squash into pasta sauce.
- Chicken or other bone broth? Puree veggies into the broth. Use just enough veggies to add vegetables to the broth and your meal but not enough to turn the broth into stew. Bone broth video added below.
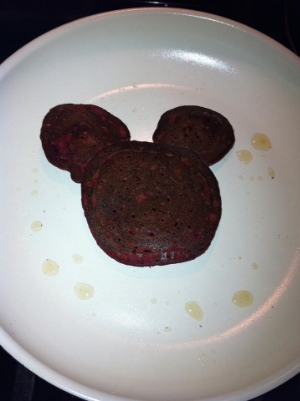
Fun shapes always amused my kids into eating veggie infused pancakes.
Photo Courtesy Of Christina Smith, Parishville.
For more fun ideas of how to add veggies to your life, click here.
Cheers and Happy Valentine's Day!
Today... & Rethinking Winter Veggies
Rethinking Winter Veggies:
Here are two questioning comments I hear often around changing the diet to a whole food and seasonally based one:
- There are no vegetables that grow in Northern NY in the winter time. I have to purchase kale, cucumbers, tomatoes, and other vegetables that are grown in Florida and California. Otherwise, what would I eat?
- OK, so I am getting to know the local vegetables that are available in late fall and winter but what do I do with them?

My root veggie picture,
inspiring me from the kitchen wall!
A list of winter storage vegetables available in Northern NY:
- cabbage: red and green
- winter, hard squash (there are many varieties)
- beets
- carrots
- turnips
- rutabaga
- celeriac
- radish
- salsify
- burdock parsley root
- parsnip
- potato
- onion
- garlic
Farms and stores to purchase local (winter) vegetables in Northern NY: (I am certain this is not an all-inclusive list; investigate and find a farmer who grows good food near you!)
CSA Farms for Winter Veggies: (Again, not an all-inclusive list BUT to find more, go to www.gardenshare.com, Gardenshare's Local Food Guide and find a farmer near you who offers what you are looking for.)
OK, now for the cooking part. I am not going to put recipes here. I am more in favor of people learning to improvise in the kitchen: grab what you have and be creative based upon time honored methods of cooking and seasoning. Trust me, it is easy. Take a deep breath and just relax and let the cooking flow!
- Mashed potatoes are yummy! Try any of these root veggies in the mashed version, adding milk and butter. Try several root veggies steamed up and mashed together. Hint: When you steam, simmer, or boil the root veggie: use the least amount of water necessary and simmer gently. Maybe an inch of water in the pot, depending on the pot size and the amount of veggies. (Do not "rolling boil" them to death; it kills the flavor and the nutrients. As you boil off the nutrients you are boiling away the flavor!) Pour the "simmer" water off into a coffee mug and drink it. There will be just a little bit of water left by conservatively adding water and simmering gently.
- Roast any or all of the root veggies. Chop into bite size chunks, coat with your favorite oil sturdy enough to handle the oven heat, and roast for 35-45 minutes. Stir every 10 to 15 minutes and stab with a fork after 30 to test for tenderness. You want to create crunchy, cooked veggies, not mushy veggies.
- Soups, stews, stir fries are always good options.
- Squash, well... it is squash, roast it up. Steam them if you are short on time. Oven roasting can take 1 hour or more, steaming takes 20 minutes. A butternut squash, raw, grates up nicely into a winter veggie slaw. Just add chucks of apples, maybe a few raisins, and an olive oil - apple cider vinegar dressing seasoned with cinnamon, ginger, cardamom, and nutmeg.
- Cabbage is yummy in soups, stews, and stir fries. Saute' a pan of onions, potatoes, and cabbage and serve with your favorite protein.
- Make cabbage and grated root veggie slaws. (If you click that link back there, you will get one recipe from me! But... it is one I have given you many times!) This is my nightly favorite to add a "raw" salad to the winter meal fare: good fiber, good nutrients, and good enzymes from raw foods!

The above slaw is grated: red and green cabbage, celeriac, purple and orange carrots, and a Braeburn apple. The apple was so juicy I only added a bit of olive oil, a dash of cinnamon, and called it "dressed!"
More on Ice Cream's Purpose, Rommegrot, & the Conversations We Start!

I love conversation with people (my pets too!). People have the most fascinating stories if we take the time to listen; ask questions and just listen. These stories truly are the fabric of life; weaving us together as a culture.
So I had this amazing Facebook message from a reader in regards to my Ice Cream's Purpose blog post.
I learned much about the history of a certain food: NORWEGIAN ROMMEGROT and this FB message started a conversation with a local person; those threads that weave us together as community with story telling. I think I need to return to the days of evening story telling around the fire!
Here is some of our conversation, the story!
Bryan: I felt compelled to respond to your secret of ice cream as I am a big fan of ice cream...perhaps it is in my blood; my ancestors in Norway loved cows and milk in all of its incarnations but their favorite was rumagrot (poor spelling but Norwegians have a slightly different alphabet). this was a mixture of heavy cream, milk and flour, generously sweetened, with the consistency of thick pudding. At any rate, I feel that ice cream, plain old simple ice cream, has to be a divine gift, necessary to our sustenance, to be indulged in not too infrequently.
But to get back on track, your secret of setting the freezer with an ice cream gauge sounds perfect!
Me: What a great story Bryan! Do you have a recipe for the Norwegian milk and flour thing? I will try and look it up.
Bryan: ROOMEGROT? I don't have a recipe and have never made it...my mother ate it and made it as a young girl, and assured me it was delectable...she grew up on a subsistence farm where wealth was measured by the fat of the land, and fresh cream was a daily companion...later she married my father, who was not a farmer, and lived in a small town where she started buying some of her food (what a change!) cream was too dear and so cream did not make it to the list of priorities...but she did make a version of rumagrot, which she affectionately called "mush", basically a porridge of milk and wheat flour, which is the basic structure or foundation upon which rumagrot is created. After it was cooked she would pour it out on plates where it would take the shape of a giant pancake, and put a pat of butter on top. We would sprinkle sugar and cinnamon on top and start eating around the edges where it cooled fastest, spiraling into the center where the butter sugar and cinnamon were concentrated for a very fine finish. Then we would lick our plates clean. We loved it! The day shone gold when we came in from a winter's day to sit down to our favorite supper meal of mas mush! Some years later, as a grown man, I was meandering through various conversations with my mother, and fondly reminiscing the above. I asked my mother why she no longer made mush. She said, "uffda, you liked that stuff?" (She never knew?) "I only made that when there was nothing left to eat." Ahhh...take me back to the realm of childhood!
I just LOVE this story, this conversation, and the magical things I learned as I looked up Norwegian history, Norwegian food history, etc.!
Of course, I had to make some, see below.

Here is my kitchen's rendition of this Norwegian food. Of course I made it with 100% whole food ingredients. I used whole grain rye flour.
My kids were ok with it. My oldest said it was quite good. My youngest, he is a picky 'lil eater, said he was not crazy about it. He has to eat something 3-4 times before he will decide to like or to hate it.
Me, I thought it was perfectly yummy!
The recipe I used:
(I did cut the recipe in 1/4 as the amounts seemed like a really big batch to me. It made the 2 dinner plates worth above with a little bit left for a smaller plate. The next time I make it, I will make 1/2 of the recipe.)
NORWEGIAN ROMMEGROT
1 qt. milk
1 c. half & half
1 c. butter
3/4 c. flour
1/2 c. sugar
1/4 c. butter
Sugar & cinnamon
Heat milk and half and half; do not scorch; set aside.
In large, heavy pan, melt 1 cup butter and add flour, cook about 5 minutes, stirring constantly.
Pour in milk, cook, stirring frequently until mixture bubbles and thickens. Stir in sugar. Pour 1/4 cup melted butter on top. Sprinkle with sugar and cinnamon. Serve warm. Makes 1/2 gallon.
NOTE: This may be kept warm and served from a crock pot. Use low heat. Add butter, sugar and cinnamon after mixture is put in crock pot. Rommegrot is traditionally served at Christmas.
From: http://www.cooks.com/recipe/fw91j8hr/norwegian-rommegrot.html
PS Check out my upcoming webinar:
Starting January 5th, just in time to support vibrant, juicy health & healing in 2015! Enrollment information coming soon.
My Mission: Creating a healing wave that ripples from my Northern NY home out into the world. Healthier people create healthier families, communities, and the world as a whole!
The Protein Powder I Would Make and Use

This ad and questions I am asked all the time prompted me to write this article. I have written about protein powders before, click here. My advice has not changed.
Do you use protein powder Paula?
Should I be buying and using protein powder?
What is the best protein powder to use, the best base substance the protein comes from?
Answers: No, No, and Real Food.
A protein powder is derived from some food that the protein has been removed from. This creates a concentrated protein.
Let's be mindful around the food we eat. Protein powders are refined food products. The protein has been extracted from the whole food. Why not just eat the whole food? And, how exactly do they, whoever they are, extract the protein? Chemicals? Extreme heat?
Mindfulness: Eat whole food.
The above powder ad says it is made from pea, hemp, chia, potato, and chlorella protein... (keep reading below the picture!)

Instead of Refined Isolated Protein Powder From These Sources, Try this:
- Buy hemp, chia, sunflower, golden flax, pumpkin, and sesame seeds. Organic and raw, of course.
- Measure 1/2 to 2/3 cup of each into a mixing bowl.
- Blend them together well.
- Pour into a wide mouth quart canning jar.
- Use 1 to 2 (or more to your liking) tablespoons in your morning oatmeal, granola, smoothie....
You now have the benefits of a whole food, not just the refined out, isolated protein. You get the healthy fats, the fiber, and all the nutrients that are lost in refining of a whole food into just the protein powder.
Whole foods feed your body cells for:
- healthy cell regeneration
- preventative medicine
- healing medicine
Wapatuli Pie Recipe

I remember Wapatuli Punch Parties from my college days... all too well. A cooler full of fruit juices, fruit chunks, and vodka-rum-whiskey and the party was on a roll.
Call me old but I like my Wapatuli pie better!
When Jake asked me to make him an apple pie I was low on apples. I combined apples, cranberries, blackberries, and blueberries (all local fruit I froze over the summer, apples fresh from Martin's Farm Stand). I chuckled as I was making it as my mind immediately went to college Wapatuli Parties!
Pie Filling:
- 2 large apples cut into bite sized chucks, leave skin on for the nutrients and fiber
- about 1 cup of each berry, add more to have enough to fill your pie plate
- 1/2 cup of sucanat, unrefined sugar
Pie Crust:
- 2/3 cup of a mixed flour blend: quinoa, amaranth, millet (I grind myself in my electric coffee grinder)
- 1/3 cup dark buck wheat flour (why the crust looks so deep brown)
- 1/2 cup each coconut flour and almond flour. I only used these as I was out of the above mix blend and did not feel like grinding more.
- 2/3 cup pasture raised butter
- 1/4 tsp. unrefined sea salt
- 5-6 tbsp. cold milk, the coconut flour soaks up more fluid as I usually use about 2-4 tbsp. cold milk
- extra flour for rolling out crust, I used the buckwheat flour
A whole grain crust is a much tastier way to enjoy pie. It has flavor unlike refined, white flour crust which taste like baked wall paper paste and butter. The butter is its flavor saving grace!
Place all ingredients into a food processor and process until the whole mess rolls into a ball. Cut ball in half and roll into pie crust and make your pie.
Whole grain pie crust can be crumbly. (See picture at bottom. I had to piece together a few patches!) Take time and be gentle with it. I use a cotton mat and a cotton sock cover for my rolling pin. I bought these in a package kit at Evans and White's Hardware in Potsdam.
Put the pie together and bake for 45 to 60 minutes, just until it starts getting bubbly. There is no need to over cook fruit.
Enjoy!
