
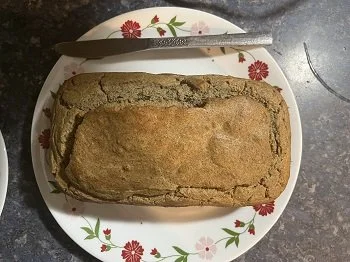
My Best Gluten Free - Grain Free Bread Yet!

UPDATED 9/28/22
Why was this particular loaf so much better? I have made several varieties of the gluten free, 100% whole food flour, bread from various websites. One was too eggy. It had 6 eggs per one loaf of bread. It was more like eating some sort of weird loaf of quiche. Others were too moist and dense. This one I remedied by cutting the eggs to 4, adding lots of extra butter, and using milk.
The top is nice and brown crispy. And it is not doughy in texture. I had a slice warm from the oven and literally slathered in slices of butter. Delicious!
Ingredients
2/3 cup organic buckwheat flour
2/3 cup organic quinoa flour
2/3 cup organic millet flour
2 Tbsp coconut flour
1 rounded teaspoon baking soda
1 rounded tsp baking powder
1/3 cup + a little extra organic Pasture Butter, I am very generous with the butter, and I gently melt it before adding to the batter
1 TBSP apple cider vinegar
2 TBSP local maple syrup
4 local & organic eggs
3/4 cup local, organic Goat’s milk
½ teaspoon unrefined pink Himalayan salt


Vinegar, Milk, Salt, & Eggs
Melt the butter
Beat the eggs
Mix in melted butter, milk, & maple syrup
Mix dry ingredients together
Add dry to wet & mix well
You will have more of a thick bread batter than a traditional yeasted bread dough
Pour into a well buttered bread pan ( I use 8 1/2 L X 4 3/4 W X 2 3/4 D )
Bake at 350F for 55 minutes or so until top is crispy brown & loaf pulls away from the bread pan sides
Let cool for 10 minutes and then remove to a plate. Allow to finish cooling.
Slice & use for your favorite sandwiches, toast for a buttery delight, add jam, melt cheese on, spread with hummus / peanut butter / Nuttzo butter… whatever pleases you! Bologna from well raised pigs?? I no longer have a source for such childhood comfort foods. Bummer.

Goat’s Milk Butter

I have one frozen package of Piggery Bologna left… the business has been closed for over a year. I will miss this pasture raised pork bologna when I finally decide to break it out of the freezer and indulge.
Stinging Nettle Cake
I can't proclaim the brilliant idea for this cake came from me. I confess, I eat nettles in every way possible, even blending up raw in a morning green drink (yes, all green plants come from my lawn). When Debbie Miller of Earth Rythm Wellness in Ogdensburg, NY shared the recipe with me... I think the whole North Country knows I am a Nettle Queen, I thought "Why Not?" We make carrot cakes, beet cakes, zucchini cakes and breads; nettle cake sounds like a splendid idea to me.


I can't proclaim the brilliant idea for this cake came from me. I confess, I eat nettles in every way possible, even blending up raw in a morning green drink (yes, all green plants come from my lawn). When Debbie Miller of Earth Rythm Wellness in Ogdensburg, NY shared the recipe with me... I think the whole North Country knows I am a Nettle Queen, I thought "Why Not?" We make carrot cakes, beet cakes, zucchini cakes and breads; nettle cake sounds like a splendid idea to me.
The original recipe came from Kate Hackworthy, a freelance food writer, magazine columnist and blogger who admits to being unashamedly obsessed with vegetables. I don't know her but I like her already! Kate lives in the UK and writes about her veggie obssessions on her blog Veggie Desserts.

The raw nettles about to get blended into a non-stinging cake patter puree, see #7 below.
Here is what I did differently. Come on, don't act shocked. If you know me, you know every recipe gets the Paula Whole Food Makeover.
- I added pasture raised goat's milk (nope, I don't have goats but I love my farmer and farm family who care for my goats.)
- I used 4 eggs, yup, from the same loved farmer. Eggs bind things better and I use gluten free flours. No gluten in the flour and things tend to get crumbly, cakes can fall apart. But, the frosting always glues things back together nicely! ; )
- I stuck with the 3/4 cup sugar. Surprised? Are you saying: "What? Paula always decreases the sugar?" Yes, I do but most cake recipes call for 2 cups of sugar that I immediately decrease to 2/3 or 3/4 a cup. Kate, the veggie loving gal from the UK, did this for me!
- At least 1 tablespoon (3 teaspoons) of real, organic vanilla. Recipe called for 2 teaspoons. I am heavy handed with vanilla and pour right from the bottle into the batter despite what my high school home ec teacher tried to teach me. Sorry Jane.
- I used 1 1/2 to 1 3/4 cups of gluten free flour not refined, white, wheat flour. This is why my cake will not be so luminous green from the nettles but more of an earthy brown tinted green. I used a blend of oat, quinoa, millet, and amaranth flour that I ground fresh. All organic and the oats are certified gluten free as well.
- I used a very full, very rounded tablespoon of baking powder not the 2 teaspoons the recipe called for. Gluten free flour is, well gluten free, and can use a 'lil kick in the bran and germ butt to get fluffed up. Do not be mistaken: this cake will not be the light fluffy cakes you are expecting from baking with refined white flour. Will it be yummy: yes it will!
- Nettles: I easily over did the 2 packed cups. I did not boil them. The nettles are being pureed in the blender and baked in the oven. If the sting can withstand that well then sting away baby! Seriously, just blending the raw nettles into the batter gets rid of the sting. I make pesto with raw nettles all of the time and never have I been stung.
- I added 1/2 to 3/4 a tsp. of baking soda. Not sure why, just a habit and seems fitting with gluten free flour. (No, I do not used refined gluten free flour mixes of tapioca, potato, and/or white rice flour. Most gluten free flours and products are crap food sources that do not feed cellular health.)
- For the frosting: I made my customary heavy cream & neufchatel cheese frosting to which I added in the 1/2 lemon's worth of zest and 1/2 lemon's worth of juice (1 tablespoon). I did use a fresh organic lemon for the zest but I saved the juice part for my liver flush am drink and used bottled organic lemon juice. I figured the juice was getting baked at 350 F and would destroy the vitamin C so why not use the fresh lemon juice right now in its raw state? Yes, this is how my mind works all of the time.
- I used Sucanat unrefined organic sugar not refined white table sugar.
- I poured the batter into one 9" round cake pan instead of the two 7" pans. I like to slice cakes in half and toy with the gluten free flours ability to hold up to my kitchen play. The then raw cut surface of the cake soaks up the yummy frosting better. This took 50 minutes of baking at 350 F. I then cracked the oven door about 3-4 inches, shut off the gas, and let it sit there in the warm oven to cool.

The cake batter in a 9" pan looking a bit olive drab green not the bright green of Kate from the UK's cake, See # 5 & # 11 above explaining pan size difference and cake color difference.
OK, Ok, I will quit finger babbling and give you the ingredients and directions.
Into the VitaMix Blender I put:
- 1 cup goat's milk
- 4 eggs
- 2+ packed cups of raw nettle leaves, stems not removed 'cuz I am a nettle rebel
- 3/4 cup sucanat unrefined, organic sugar
- 1 tbsp. vanilla extract
- 3/4 cup soft butter (extra for lubing up the cake pan really well)
- zest of 1/2 lemon
- 1 tbsp. organic lemon juice
- 1 3/4 cups gluten free flour: oat, amaranth, quinoa, millet (no refined crap please, see #8 above)
- 1 tbsp. baking powder, aluminum free please, your brain will thank you
- 3/4 tsp. baking soda
- 1/2 tsp. unrefined sea salt of the pink Himilayan variety
- Preheat 350 F oven.
- Blend into a greenish brown frenzy.
- Stop 2-3 times to scrape the sides down.
- Rub that luscious butter all over the insides of the 9" cake pan.
- Pour cake batter into butter loved pan.
- Slip into that hot 'ole oven and bake for 50 minutes.
- After 50 minutes, slip a knife into the cake to see if it is done, finished, baked to perfection.
- If so, keep oven cracked 3-4 inches and leave cake on the rack.
- When cool, frost your 'lil stinging nettle cake with the frosting I use for everything...
Frosting:
- Organic heavy cream, one or two 8 oz containers
- Organic Neufchatel Cheese, one 8 oz package
- 2 - 4 tbsp. dark maple syrup
- Zest of 1/2 lemon
- 1 tbsp. lemon juice, basically juice from 1/2 lemon
- Put all ingredients in a mixing bowl and use an electric hand mixer to whip into frosting consistency.
- You can slice the cake open for 2 layers, if you wish. I suggest proceeding with caution as gluten free cakes can be tricksters.
- Frost.
- Let sit for a bit to settle into the flavor melding.
- Serve with the Blackberries that Kate of the UK suggests, or not.
- Enjoy. Nettles are amazing nourishing food. Adding them to cake makes sense!
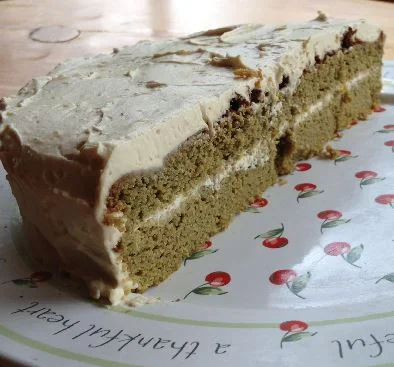
Voilà: The finished cake!
Because of the whole grain flours and unrefined sugar (very brown and not white like refined baking ingredients), the cake does not have the luminous green of Kate's of the UK. It was delicous. As with all whole food baked goods I like to tell people to get used to the heavier texture. Unrefined foods mean you have the density of fiber, minerals, vitamins, complex carbohydates, proteins, and fats... not light, fluffy refined and empty calories (cellular health degenerating). Dense food is real food feeding your cellular health.

Happy Memorial Day!
Be Grateful to All who have given to make your life better.


Need support around finding your personal space of gratitude in this world? Jenny Morill & I share our new book about creating mindfulness & healing. We hold sacred space for you.
Iced Chai Anyone?
We have more hot days predicted for next week. A glass or mug of easy* iced chai tea and a peaceful sitting space might just cultivate a relaxing moment or two.
Here's how I do it:
- I make 12 ounces of very strong black tea, let it cool, and make it into ice cubes. (Yes, this takes a little time but it so worth the effort. Using plain water ice cubes just dilutes the chai tea flavor.
- Put 4 chai ice cubes in your blender.
- Add 1/2 to 2/3 cups full fat milk from some sweet pasture raised, lactating animal (or your favorite nut/seed milk)
- 1/2 to 1 tsp. chai spice mix - see below
- 1/4 to 1/2 tsp. real vanilla extract
- 1 tsp. local, raw honey
- optional pinch of black pepper
- Blend into a frothy liquid and pour into a wide mouth, pint ball canning jar or some other acceptable, glass receptacle.
- Enjoy!
- Double or triple to share with a friend or two.
*I say easy because making traditional hot chai is a process that simmers the whole herbs and spices; not the below ground blend I am suggesting you mix up and have handy for easy iced chai making. In a jar I put: (keep in mind these are all approximate measures and proportions based upon the strength of the spice flavor.)
- 2 tbsp. cinnamon
- 1 tbsp. cardamom
- 1 tbsp. ginger
- 1-2 tsp. nutmeg
- 1 tsp. cloves
- 1-2 tsp. star anise
I make a batch of this and keep it in an 8 oz. ball jam jar. I also use it in cooler weather to whip up an easy hot chai tea.

The Protein Powder I Would Make and Use

This ad and questions I am asked all the time prompted me to write this article. I have written about protein powders before, click here. My advice has not changed.
Do you use protein powder Paula?
Should I be buying and using protein powder?
What is the best protein powder to use, the best base substance the protein comes from?
Answers: No, No, and Real Food.
A protein powder is derived from some food that the protein has been removed from. This creates a concentrated protein.
Let's be mindful around the food we eat. Protein powders are refined food products. The protein has been extracted from the whole food. Why not just eat the whole food? And, how exactly do they, whoever they are, extract the protein? Chemicals? Extreme heat?
Mindfulness: Eat whole food.
The above powder ad says it is made from pea, hemp, chia, potato, and chlorella protein... (keep reading below the picture!)

Instead of Refined Isolated Protein Powder From These Sources, Try this:
- Buy hemp, chia, sunflower, golden flax, pumpkin, and sesame seeds. Organic and raw, of course.
- Measure 1/2 to 2/3 cup of each into a mixing bowl.
- Blend them together well.
- Pour into a wide mouth quart canning jar.
- Use 1 to 2 (or more to your liking) tablespoons in your morning oatmeal, granola, smoothie....
You now have the benefits of a whole food, not just the refined out, isolated protein. You get the healthy fats, the fiber, and all the nutrients that are lost in refining of a whole food into just the protein powder.
Whole foods feed your body cells for:
- healthy cell regeneration
- preventative medicine
- healing medicine
Wapatuli Pie Recipe

I remember Wapatuli Punch Parties from my college days... all too well. A cooler full of fruit juices, fruit chunks, and vodka-rum-whiskey and the party was on a roll.
Call me old but I like my Wapatuli pie better!
When Jake asked me to make him an apple pie I was low on apples. I combined apples, cranberries, blackberries, and blueberries (all local fruit I froze over the summer, apples fresh from Martin's Farm Stand). I chuckled as I was making it as my mind immediately went to college Wapatuli Parties!
Pie Filling:
- 2 large apples cut into bite sized chucks, leave skin on for the nutrients and fiber
- about 1 cup of each berry, add more to have enough to fill your pie plate
- 1/2 cup of sucanat, unrefined sugar
Pie Crust:
- 2/3 cup of a mixed flour blend: quinoa, amaranth, millet (I grind myself in my electric coffee grinder)
- 1/3 cup dark buck wheat flour (why the crust looks so deep brown)
- 1/2 cup each coconut flour and almond flour. I only used these as I was out of the above mix blend and did not feel like grinding more.
- 2/3 cup pasture raised butter
- 1/4 tsp. unrefined sea salt
- 5-6 tbsp. cold milk, the coconut flour soaks up more fluid as I usually use about 2-4 tbsp. cold milk
- extra flour for rolling out crust, I used the buckwheat flour
A whole grain crust is a much tastier way to enjoy pie. It has flavor unlike refined, white flour crust which taste like baked wall paper paste and butter. The butter is its flavor saving grace!
Place all ingredients into a food processor and process until the whole mess rolls into a ball. Cut ball in half and roll into pie crust and make your pie.
Whole grain pie crust can be crumbly. (See picture at bottom. I had to piece together a few patches!) Take time and be gentle with it. I use a cotton mat and a cotton sock cover for my rolling pin. I bought these in a package kit at Evans and White's Hardware in Potsdam.
Put the pie together and bake for 45 to 60 minutes, just until it starts getting bubbly. There is no need to over cook fruit.
Enjoy!

Ice Cream's Purpose
To Every Thing (turn, turn) there is a season (turn, turn)...
To everything there is a purpose!

So you are asking me, what real purpose could ice cream possibly have? Ready for a story? Sit down, let me tell you a story. Stories are the fibers that weave us together as community!

The recent Indian Summer has been a joy. I love warm fall days with bright blue skies. 75 degrees is about as perfect as it gets. This is still good swimming weather!
The sudden Autumn heat made me think some ice cream would be a good idea. Now I confess, I am not a big ice cream eater, maybe once or twice a summer. Ice cream was just appealing to me. My sister was visiting during this fine summery fall weather. After a hike in Stone Valley, I threw out a "Hey, let's get some ice cream" to her and my kids.
Mistake #1, I opened my big mouth before I thought about it and they (my 2 boys and my sister) were not going to let me off the hook on this one.
So, off to the Potsdam Food Coop a shopping we will go! (I had my way and organic, quality ice cream was on the shopping list!)

I suggested we try a pint of The Three Twin's Dad's Cardamom flavor ice cream. Somehow we left with that, the Sea Salt Caramel, AND the 3 pint container of the Alden's Organic Vanilla ice cream. My sister wanted to get the Three Twins Milk Coffee ice cream as well.
Someone had to be the voice of reason... 5 pints of ice cream for 4 people? Seriously? They listened, we skipped the coffee ice cream!

So, are you wondering about the whole "ice cream's purpose" thing here? Let me just say this:
Ice cream in your freezer is like the canary in the coal mine. It is the perfect way to gauge the correct temperature setting of your freezer. Ice cream too hard to eat? The freezer needs to be turned down, meaning the temperature inside the freezer needs to be raised a bit. Ice cream too mushy and runny? Time to set the temperature in your freezer a tad bit lower.
I recommend any freezer temperature changes be carried out in tiny, little increments and tested frequently. It is totally acceptable to leave a spoon right on top of the freezer, you know, just in case an emergency check is required.
Caution: Do not ever hide the spoon inside the freezer. Way too cold in the mouth!
Action to take: Head on over to the Potsdam Coop or your local natural food store that carries quality, organic ice cream and get some now... before the Indian Summer escapes us!
PS By the way, I do recommend the Milk Coffee ice cream. It is divine! The cardamom was exquisite! Vanilla is simply scrumptious and the Sea Salted Caramel is a must try. You decide!
Tell me your ice cream story!
PPS Remember to join the Local Living Venture and I as we rock your world (no, not with ice cream) with vibrant health and healing messages! Whole Health & Healing Academy continues this Thursday evening with Natural Foods Know How. See you there!