
Cooking Like a Kitchen Artist
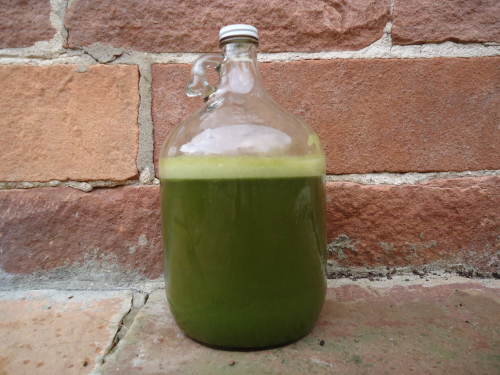
Herb Vinegar for home garden flavored salad dressings: raw, apple cider vinegar with rosemary, basil, oregano, parsley, thyme, cilantro, tarragon, mint, and nettles. I buy my vinegar from Martin's Farm Stand, add my garden herbs, and blend in the blender. Pour back into the jar, with a funnel, and enjoy all year. Put 1 quart of vinegar into the blender with the herbs and pour back into the gallon jug. Shake to mix herbs with the whole gallon.
Back a couple of blog posts, Cook Book Or Not?, I mentioned I would write about cooking like a kitchen artist. Now is the time for you to: read on, get out your local foods, and start creating with your kitchen artist's palette!

A common challenge I hear from clients and health class students is: “How do I make my cooking easy, what do I use for spices, what can I do that is different….?
First Thought: Do what is easy and familiar, make your favorite foods! The key is to turn them into whole food recipes with fresh, local, and seasonal foods.
Check out this hidden page “How to Make Any Recipe a Whole Food Recipe” to get you into the ‘whole food’ recipe make-over swing of things.
Trying to get more vegetables into your life? People get too overwhelmed by ALL the vegetables that are available in the supermarket. Common questions I hear from clients are: WHAT do I do with all of these, what goes with what, how do I cook them…..?”
Second Thought: Learn to eat in season. If the veggies you are eating are only available at certain times of the year, it makes your choices narrower at that particular time of the year. Being overwhelmed by the plethora of choices is common in today’s culture of being able to eat broccoli, strawberries, asparagus, and every other fruit or vegetable 12 months out of the year. Create meals using vegetables that are available locally and in season. This makes the choosing easier, because there is not so much variety available all the time. It also allows you the opportunity to have a diet that is varied over the course of the calendar year.
Helpful hints around seasonal eating:
- I believe seasonal eating would help to cut down on food sensitivities as well. When your body is not being subjected to the same food, all the time, you are much less likely to develop food sensitivities and intolerances. Local, seasonal eating was nature's way of varying our diets.
- When you eat locally grown food you help cut down on the transporting of food all over the globe. This can have huge impacts on the environment when we are using less fossil fuels moving food around the earth.
Examples of seasonal foods for Northern NY State:
Spring: spinach, asparagus, green onion, early lettuce, rhubarb, wild leeks, spring sorrel, peas
Summer: leafy salad greens, summer squashes, seasonal berries from strawberries to late summer raspberries & blackberries, tomatoes, peas, strawberries, blueberries, raspberries, gooseberries, currants, juneberries, cherries, garlic, carrots, new potatoes, fresh herbs, corn, onions, melons…
Fall: root veggies, winter storage squash, cabbage, apples, pears, peaches, fall raspberries
Winter: stored root veggies, kale & collards still in the garden, canned tomatoes and veggies, frozen veggies and berries
Many websites offer their version of a “what produce is in season” charts for the geographical region you live in. www.gardenshare.org
http://www.simplesteps.org/eat-local
When you eat seasonally, what you eat changes with each seasons. Your meal planning and preparing takes on a rhythm of simplicity. I cannot stress this enough: keep it simple. Do not over think things. Wing it in the kitchen. If the meal was a winning combination, do it again. If the meal is not the taste you were looking for, eat it with gratitude for the farmers who grew the food, the earth/water/sun, etc. that provided the growing environment, and the work you did in the kitchen. Make a mental note (or keep a cooking journal, if that is easier for you) and do not repeat that particular cooking concoction.
If you think about vegetable dishes, they are the same things just cooked a different way. One fall or winter night you might roast potatoes, carrots, onion, and parsnips and another night you might throw those same types of veggies into a beef or chicken stew. On another night you might stir fry them and add meat, fish, scrambled eggs, or beans. Another night you might gently steam them, mash them up with grass fed butter and unrefined sea salt, and serve with a side dish of chicken, beans, or fish. This is what I mean about simplicity and not over thinking.
To these above meals add a grated root veggie salad using different root veggies: rutabaga, celeriac and beets with some finely chopped cabbage. Toss with an herbed, homemade oil and vinegar dressing and voila, dinner!

Summer cooking will be more tomatoes, eggplants, peppers, yellow squash and zucchini, and other summer veggies enjoyed with green, leafy salads and raw carrots, baby beets, and cucumbers.
Let go of the idea that you have to work from a recipe and cook up this fabulous gourmet meal every night. 100 years ago, people ate what they had on hand, in season, with no regards for cook books and recipes.
In my herb garden I grow: mint, basil, cilantro, parsley, oregano, thyme, rosemary, tarragon, sage, marjoram, certain edible flowers, etc. It is so easy to step outside, cut a bunch of herb sprigs and brighten up a raw salad or add to cooked vegetable just before you serve them. I do not recommend cooking the fresh herbs as you will save the fresh flavors for your eating enjoyment.
I keep standard herbs and herb blends handy to spice things during the non-garden, no fresh herb months:
Italian spices: rosemary, thyme, oregano, parsley, basil, marjoram
Curries: mild, medium, or hot to your liking
Chili type spices: Chili powder, cumin, turmeric, and coriander
Pulled pork blend: (I also put this on chicken, in chili, and in stir fries if I am looking for this particular taste): ground pepper, cumin, garlic powder, onion powder, paprika, chili pepper, thyme, all spice, turmeric Use 1 Tbsp. of each spice except 1 ½ tsp. thyme, allspice and turmeric
Chinese 5 spice for Asian stir fries
Cooking and eating is wonderful, tasty fun! Relax and enjoy the process for good health in mind, body, and soul!
PS
I was making chocolate chip cookies this AM, for my boy's school lunches, and I reminded myself of a wonderful Whole Food Recipe Conversion tip:
- Never use 100% oat flour to make cookies. Why you may ask? Not because the flavor isn't yummy... it is because the cookies are very crumbly. Frankly, they can fall apart if handled roughly. Now eating cookie chunks and crumbs is an ok thing but a whole cookie that does not fall apart has a certain appeal!
OK, recipe... I know I will get emails asking where is the recipe? See below.

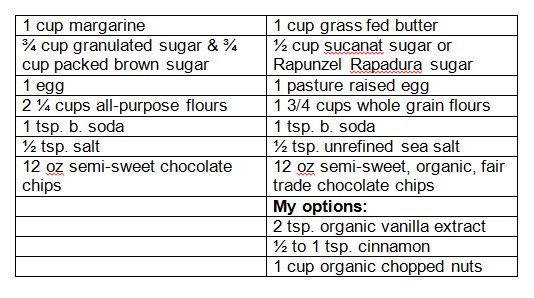
The cookie recipe began in this Betty Crocker cookbook!
The below recipe is the chocolate chips cookies, the left side is the original recipe and the right side is the converted to whole foods recipe.
- Heat oven to 375 F.
- Mix butter, sugar, and egg. Add vanilla here if using and I encourage vanilla!
- Stir in flour, b. soda, and salt. Add cinnamon here, if desired.
- Add in chocolate chips and nuts (if using nuts).
- Dough will be stiff. Allow it to sit for 5-10 minutes as the whole grain flours continue to absorb the liquids. If dough is not stiff enough for cookie dough consistency, add 1 tbsp. of flour at a time to get it to the necessary stiffness of cookies.
- Bake one cookie for 8-10 minutes as a tester.
- If all looks good with that one cookie, bake those cookies up & enjoy!

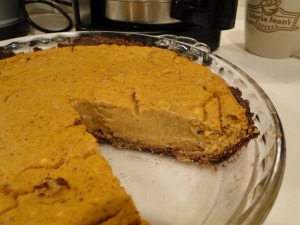
The finished, yummy, oat flour chocolate chip cookies! They do not last long!
Comments, thoughts? Write me a note in the comments below. Happy day to you!
Whole Food Pumpkin Pie!
I had a request for how I would make a lower sugar, lower carb pumpkin pie for the fall holiday table... maybe for Thanksgiving, Fall Equinox, a Harvest Fest... you decide when and whip up a tasty, whole food pie treat.
Here is how I make my yummy Autumn pumpkin pies. Enjoy!

Lower sugar, low carb Pumpkin Pie
Ingredients Praline Crust:
- 1/4 cup melted butter*
- 1 1/4 cup finely chopped pecans (almonds or coconut are other fun variations)
- 2-4 tbsp. sucanat sugar (Potsdam Coop & Nature's Storehouse)
- 1/8 teaspoon unrefined sea salt
- 1/8 to 1/4 teaspoon ground cinnamon

Sugar Pie Pumpkins
Pie Filling: You can also use a butternut or buttercup squash.
- 1 (15-ounce) can no sugar added pumpkin filling, organic of course. To cook your own pie pumpkin, see below.
- 1/3 to ½ cup sucanat sugar
- 1 tablespoon pumpkin pie spice
- 1 Tbsp. vanilla extract
- 1 1/4 cups heavy cream* (If you buy a pint of heavy cream, use 1 cup here and 1 cup for whipped topping, just add 1/4 full fat milk* to make up the difference.)
- 4 eggs*

Long Pie Pumpkins
Directions: Preheat oven to 350 degrees F.
Make the crust:
- Mix all crust ingredients together in a small bowl.
- While mixture is still warm from the butter, press it evenly into the bottom of a deep-dish pie pan.
- Bake for about 5 minutes, or until browned.
- Remove pie crust from oven.
Make the filling: Turn oven to 425 F
- Place all filling ingredients in a medium bowl and mix well with a wire whisk.
- Pour filling into your pre-baked pie crust.
- Bake for 15 minutes and then reduce the oven temperature to 350 degrees F.
- Continue to bake for an additional 50 to 55 minutes.
- To test to see if cooked enough, stick a sharp knife in the center; if it comes out clean, the pie is done.
- Cool and then chill before serving.
- To serve, top each slice with a dollop of low carb whipped cream.
Lower Carb Fresh Whipped Cream:
- 1 cup heavy cream*
- 2 tbsp. to ¼ cup sucanat sugar
- 1-3 tsp. vanilla extract, I tend to go for the more is better, you do not miss the sugar when you add vanilla, maybe a dash of cinnamon too!
Cooking your own pie pumpkin: I take the whole little pie pumpkin and put it in a pot with about 1 inch of water in the pot. Cover, bring to a boil, and reduce heat to a very gentle simmer. Check in 30 minutes, if a sharp knife slides into the flesh easily, it is done. I carefully remove it from the pot and put it in a bowl or plate with upturned edges. Cut into pieces and puree the whole pumpkin: seeds, skin, and all. A blender works best. Use what you need for the pie and make curry pumpkin soup with the rest!
Curry Pumpkin Soup: This is as easy as putting the rest of your pie pumpkin in the blender with milk* (add enough milk to blend the pumpkin into a puree and then add what you need to get the thickness you are looking for in a creamy soup) and adding your favorite blended curry spice to your taste. Blend, heat, enjoy!
*I suggest using butter, eggs, and whipping cream be from animals raised naturally: grass fed cows and chickens foraging for their own natural foods.
Back To School Stress Free!

Creating Back to School Flow
The return to school, fall schedules, can bring on a bit of stress. Summer has its go with the flow, easy kind of existence. Easing back in to fall can be made simple and stress free by taking a few mindfulness steps.
1. Remind yourself that fall, and the return to school, means a return to an organized, set schedule. Knowing where you need to be, 5 days a week, can bring a level of comfort after the chaos of spontaneous, summer living. Revel in this return to harmony.
2. Start your day with an AM grounding experience. I do a blended visualization / meditation that takes 5-7 minutes and grounds me for the day. I sit on the stone steps in my back yard with my feet in contact with the ground. (Urban dwellers, sit and visualize your feet in the grass, connected to Mother Earth!) I close my eyes and visualize white light coming from the ground, up through my Chakras and Nadis, then turns around at the crown Chakra and goes back into the earth taking all negative (dark light) energy back into the earth to be absorbed. I visualize white light coming from above, through my crown Chakra, and circling back up at my root Chakra taking negative energy back into the atmosphere. I do both of these twice. Next I visualize white light coming from the earth again, up through my root Chakra. When It turns the corner at my crown, this time it goes back into the earth and creates a root system from my tailbone down into the earth. Now visualize white light from the crown Chakra, turns at the root Chakra and turns again at the crown Chakra to go back into the earth. Again, visualize the roots coming from your tailbone deep into the earth to ground you for the day’s challenges. Finally, I swirl white light energy around my body, from feet to head, like a twister moving up my body. This is to protect me from negative energy and other’s stress.
3. Create peace in your life with a regular yoga practice. The benefits of Yoga are profound. You will intuitively move towards healthier choices in your life. Your mind will become calm. Your body will respond physically, emotionally, intellectually, and spiritually to the beauty of yoga. Your body will be in the flow of life. This is true mind, body, soul healing.
4. Nourish your body with 100% whole foods. To get started on whole food eating, pick up a copy of my book, Hands On Health: Take Your Vibrant, Whole Health Back Into Your Healing Hands.
5. Get to bed and be asleep before 10 PM. When your body is asleep before 10 PM, the level of stress hormones in your body drops. When you stay up late, burning the midnight oil, your body pays through higher levels of cortisol hormones. This is stress. Sleep, sweet dream sleep, before 10 PM and your body’s glandular system works for you in a balanced manner, making happy feel-good hormones!
6. Get outside every day, preferably moving your body. Yes, I mean exercise. Call it movement magic that heals the divine you! Something as simple as a brisk paced walk in the fresh air and natural light can do much to reduce stress, create feel good hormones, help you sleep better at night, and ease the challenges of daily life. Get outside in sun/wind/rain/snow/fog, walk barefoot, sit on ground, hug a tree, rest your spine against an old growth tree… just breathe in the world around you. Your body, mind, and soul will thank you for this grounding, earthy experience.
Positive, holistically-minded, lifestyle choices make for healthier, happier living. For a full list of lifestyle choices I recommend to my holistic health coaching clients, click here.
Be well; very well, Paula ; )

Stalking the Wild Nettle
Nettles are my favorite healing herb. This fact about me is something I do not hide. Now I have plenty of other herb friends, both cultivated and wild, that run a semi-close second in my favorite herb department. Nettles are #1!

Nettle seeds
In the above picture you are looking at the beautiful tiny seeds that dangle in strands from the nettle plant. These seeds are powerhouses of nutrition for nourishing thyroid health. The dose is 1/4 teaspoon daily. I would take this as 1/8 teaspoon, twice daily.
To dry nettle seeds I cut the entire stalk at the base and hang them upside down in a warm and dry space. Make certain you have a screen or something similar underneath the hanging plants to catch any falling seeds. When they start to dry, I carefully cut each strand from the stalks. I put them in a paper bag, poked with a knife to make many air holes, and hang the bag to completely dry the seeds. Leave the top of the bag wide open for better air flow. You can also use a very fine mesh bag to hang and dry the seeds.
The remaining stalks can be left to dry out the leaves. Again, trim the completely dried leaves off the stalks and store them in an air tight container. You now have dried nettle leaves for adding to soups, stews, sauces, and for making healing tea.

The beautiful nettle plant displaying her seed strands.

Looking straight down at the nettle plant. The seeds strands form a whorled pattern about this beautiful, healing plant.
Nettle's many healing gifts to your body:
- strengthens the kidneys and adrenal glands
- builds natural energy from the inside of the body (which is the opposite of coffee's effects in the body, coffee wears out the adrenal glands, nettles builds and heals the adrenals
- nourishes the hair and skin making you shine with vibrant health
- is an adaptogenic herb, helps a living organism adapt to stress (adrenal health!)
- rebuilds and restores the body cells as nettles is a powerhouse of nutrition
- great for reducing allergies on its own or make an herb honey with raw, local honey and nettle puree, take 1/4 teaspoon twice daily (This is basically making a tincture using honey as the base.)
- great for nourishing the male and female reproductive tracts
- nourishes thyroid health and contributes to body weight balancing
This is but a partial list of all the benefits nettles has in the human body. I suggest you become friends with nettles and learn all you can about her healing ways.
What you are observing, below, is a chicken nettle salad sitting on top of a romaine lettuce, carrot, and cucumber salad. In the upper left corner is a big dose of my late spring, wild leek infused sauerkraut. I got carried away and made 8 quarts! 5 quarts down, 3 quarts left to enjoy!

Chicken Nettle Herb Salad
- left over chicken breast from dinner at the ADK Cafe in Keene, NY. If you are ever passing through here, stop and eat. The food is divine, the meat is local and pasture raised!
- sprigs of fresh rosemary
- fresh chives
- nettle top leaves
- homemade mayonnaise made with 3 tablespoons whipped heavy cream, 1 small egg's yolk, and a dash of yellow mustard. I whipped the cream well, added in yolk and whipped some more, then added mustard. The cream and eggs were both from local, pasture raised animals cared for with love.
The chicken was chopped up, mayo blended in, added in the chopped herbs and nettles, and stirred all together. I plopped this decadent chicken salad on top of my veggie salad (all local veggies from Martin's Farm Stand) that was dressed with my homemade herb vinegar dressing. The finishing touch: wild leek sauerkraut!
Eat healthy, eat whole... your body cells with thrive with vibrant, radiant health!
Cook Book...
Cook Book...
To write or not to write,
That IS the ???
So I have hit the 100th person to ask me: Are you going to write a cook book?" or "When are you going to write a cook book?" I am celebrating this milestone (like celebrating the 100th person to cross the threshold of a new store or business) by chatting about it here.
Cook book or not?
I have to say, "nah, not in my plans." I thought about it for a bit and here are my issues... issues, we always have issues!
1. I am a "just throw it in a bowl" kind of gal. For example, foods like cakes, cupcakes, cookies, muffins, and pancakes all have the same basic ingredients. Some have more liquid, i.e. pancakes, while others have more flour, i.e. cookies. What I throw in the bowl depends on the consistency of the batter or dough I am trying to make.
So, to make a chocolate cake I do something like this (and hope for the best!):
- 2-3 eggs whipped up and add 1/2 to 3/4 cup melted butter (these two ingredient amounts depend on whether I am making a one or two layer cake)
- 1/2 cup sugar, unrefined, of course (I may use 3/4 if making 2 layers and it is not for my kids, most people like sweeter cakes.)
- 1 tbsp. vanilla
- 1/2 to 1 cup milk, again depending on the layers
- 1/2 tsp. baking soda
- 2 to 3 tbsp. baking powder depending on the flour (oat flour and I use less b. powder, if it is millet / quinoa / teff / amaranth flours I use more b. powder)
- 3-6 tbsp. cocoa powder depending on # of layers and how chocolate flavored I want the cake
- Enough flour to create a cake batter consistency, which is thicker than pancakes but more liquid than cookies
Set batter aside for 5 - 10 minutes to see how the flour soaks up the liquid. After 10 minutes, if the consistency is cake like, good to go. If it is too runny, I add flour a tiny bit at a time. Too thick? I thin with a bit of milk.
So, that is how I cook everything. A little of this and a little of that. Who wants a cook book written like this? I would get boo-ed and rotten tomatoes thrown at me! Most people want exact measurements.
2. Meal cooking is a process of looking at the local, seasonal produce on hand and having fun with it; playing with the ingredients, herbs, and spices. When you play with food for long enough, cooking and creating in the kitchen becomes second nature.
I suggest picking up a couple of good vegetarian cook books* (cook books that show case seasonal produce) and then read them like novels. Next, get cooking. After a bit of practice in the seasonal kitchen, I will say it again, cooking becomes second nature. It is an art work. Relax, breathe deeply, and let your creative nature just flow.
Add your favorite protein sources and whole grains to the yummy seasonal veggies and voila'... you have dinner (suggestion: make enough for lunch leftovers!).
If you have blood sugar control challenges (diabetes) eat whole grains in serious moderation, not at every meal, and up the intake of veggies instead.
3. I visited the SLU book store and checked out the cook book section. It was scary! There were 5 shelving sections of cook books with 7 shelves in each section. 35 shelves of cook books and only 2 of the cook books on the shelves had more than one copy. One was the original MoosewoodCook Book the other was a smoothie "recipe book", I believe. All of those 35 shelves were loaded with single copies of cook books on every topic and health promoting diet imaginable! That was a huge wow for me!
The 5 rows of cook books at the SLU Book Store:

3. I am all about making food an art form. The kitchen is your studio, food is your medium, and the kitchen utensils are your artist's tools!
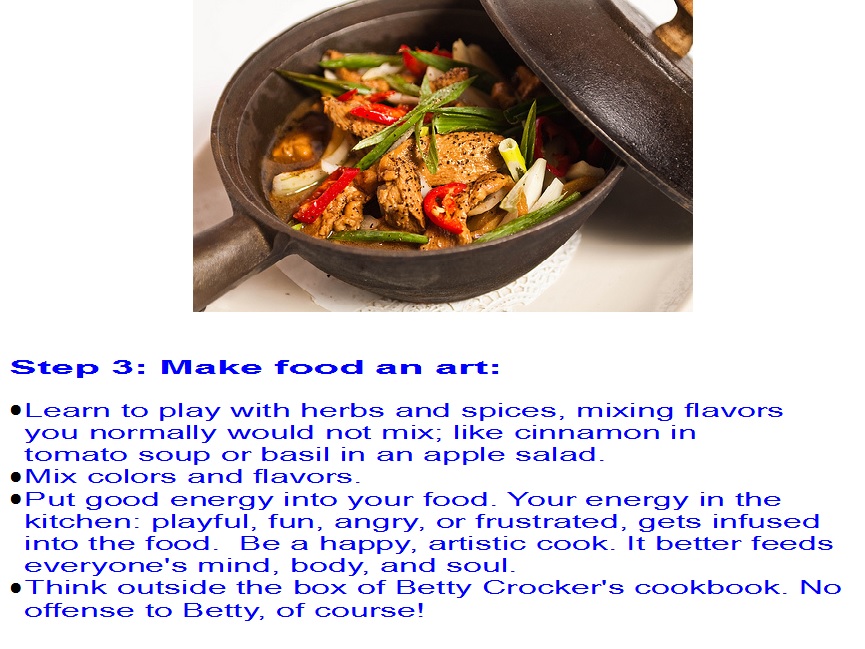
Watch for my follow up post: How to Cook Like an Artist
Be well, have fun in the kitchen! Paula
*Cook Books you might find useful:
- Home Gardener's Month By Month Cookbook, Marjorie Page Blanchard
- From Asparagus to Zucchini
- Recipes from the Root Cellar, Andrea Chesman (She also wrote Serving Up the Harvest)
If the cook book uses refined ingredients (refined, all-purpose flour, bleached or not)... use your whole food kitchen skills and swap out the refined ingredients and add in 100% whole food ingredients. Need help with this? Give me a shout, read that section in my book (Hands On Health: Take Your Vibrant, Whole Health Back Into Your Healing Hands), or zap me an email and I will send you my educational handout.
If you do not like the high fat ingredients in the Home Gardener's Cookbook, swap out for ingredients with fat contents you are comfortable with. Myself, hey, bring on the butter! (From Pasture Raised Cows, Please!)
Get cooking like the seasonal kitchen artist you can be!
PS My second book, a book of inspirational words to help you put the action steps in my first book, well... into action, was picked up by a publisher yesterday! Stay tuned as I keep you informed of the publishing process!
I call this book of words my "yoga poses" for the body, mind, and spirit book. No, that is not the book's title... that secret will be released at a later date!
Today, to celebrate, I am off to climb a high peak in those amazing ADK Mountains!

White Face from last summer's hiking ... today I am going up Dial!
Time to Harvest the Corn
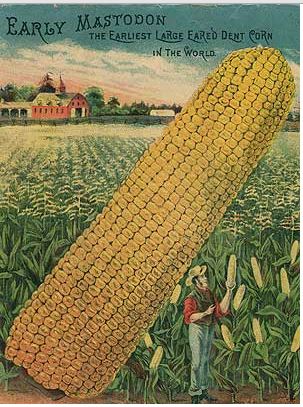
Photo from Sustainable Seed Company. Click to go to their website, check out the wisdom around growing and eating heritage seed corn.
It is corn season! Happy memories surround the late summer corn harvest: Mom coming home from the William's Family farm stand in Winthrop with an arm load of corn. We would put a ton of butter on a slice of bread and roll the hot corn cob over the bread, passing the bread around the table for everyone to use. After 5 people buttered their corn, the bread was warm with melted butter. The dilemma... who gets the amazing slice of butter bread?!
The Nutritional Benefits of Corn:
- Loaded with nutrients, anti-oxidants, and phyto-nutrients. Each variety of corn has its own amazing profile of nutrients.
- High fiber: good for digestion and elimination.
- High fiber and nutrient content creates a slow release of carbohydrates into the blood stream. This prevents blood sugar highs and lows.
This is a brief overview. There is so much information on the web about corn, its benefits, organic vs. conventionally grown, the GMO-ing of corn seed. Read up, interesting stuff what we humans do to the food supply....
Key to Buying Healthy Corn:
- Buy organic and avoid the pesticide laden corns grown by agri-business. Corn is not on the dirty dozen list but if corn is not organic, it is most likely GMO: meaning the pesticides have been genetically modified right into your corn for you. Ain't that just sweet!?
- So buy non-GMO corn as well.
- Know your farmers, ask them questions: what do you use for corn seed, is it GMO, what do you use for pesticides, etc. Ask questions because your health depends on it!
This recipe was whipped up by my older 'Sis. She brings it to family events and it gets devoured! Try it, it IS corn season!
Bean & Corn Salsa
1 can of each, drained and rinsed: Organic Black Eyed Peas & Black beans
2 ears of organically-grown, non-GMO, sweet corn (gently steamed before cutting off kernels)
1 medium, organic, bell pepper, finely diced – any colors, red, green, orange, yellow – if using 2 colors, use ½ pepper of each color. Be brave, use multiple colors!
½ large, organic, red onion, finely diced or 1 medium and use the whole thing!
SAUCE
2/3 cup organic, extra virgin, olive oil. (Can't I use my butter here? : ) Please!)
1 cup organic, RAW, apple cider vinegar
½ cup organic, sucanat (Sucanat is unrefined sugar, or you can use 1/4 cup local maple syrup or 1/4 cup local. raw honey. I would probably use less of any of these sweeteners.)
3 Tbsp. favorite organic hot sauce – increase hot sauce for more kick
Optional:
· add a Tbsp., or 2, of Dinosaur Spice Rub (Cajun Foreplay)
· mix it up, use more & different types of beans – try adding Kidney, Navy, Pinto, Aduki, and/ or Garbanzo
· adjust/increase the amount of sauce when adding more beans and making a bigger batch
Combine sauce ingredients and mix well. Add all beans and veggies and mix gently. Marinate at room temp, at least overnight. Do not refrigerate to marinate, as the olive oil will solidify in the cold temperature.
To keep salsa longer in refrigerator (if there’s any leftover), store salsa covered and drain most of sauce. This helps to keep the salsa longer and reduces calories from the oil.
Serve salsa with organic, non-GMO corn tortilla chips, or try on top of an organic, fresh green salad, or in a sandwich wrap (use a 100% whole grain wrap, Food For Life has an amazing sprouted grain wrap that I highly recommend!).
Eat and enjoy people! Enjoy the health benefits of real corn, real food!